Recent Posts

Friday, December 23, 2011

Side by Side Chocolate Chip Cookies (or High Five Cookies)

Chocolate Chip Cookies are a common addition to any dessert table, but they're also an almost guaranteed success.  Who doesn't love a chocolate chip cookie?  Especially when it's just slightly under baked, and oh so soft and chewy.  If you want to bring Chocolate Chip cookies to your cookie exchange or to your family's holiday gathering, but want a unique twist to wow your cookie-loving friends, then keep maybe this is the right recipe for you.  This is basically one chocolate chip cookie dough, split into two - One half is left as a standard chocolate chip cookie, and the other half gets a healthy dose of Cocoa Powder to make it a double chocolate chip cookie.  Then, you sit the two doughs Side by Side on the cookie pan before baking.  Daniel wanted to call these "High Five" cookies because the two doughs do a high five before being placed onto the pan.  I just love the mental image I get when I imagine two chocolate chip cookie dough balls doing a high five and then jumping onto a cookie sheet.  :)


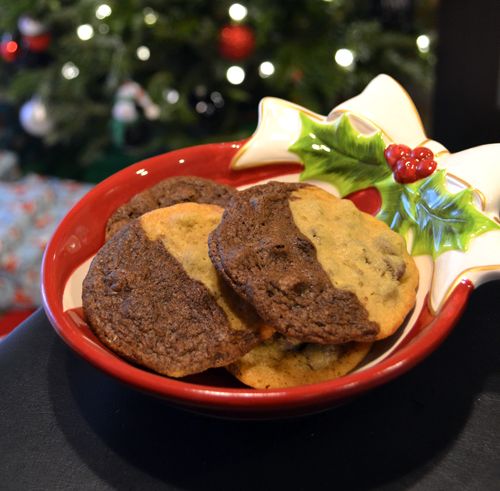
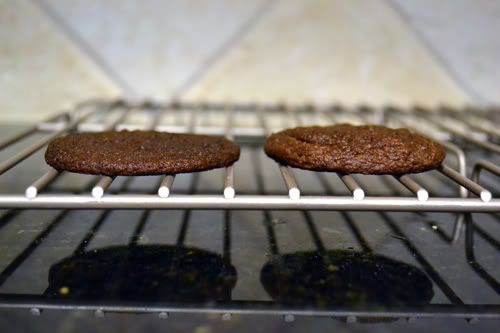
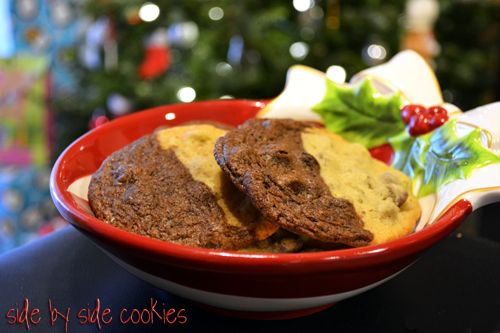
I've made recipes from this great little cookbook before, but I think it deserves a revisiting.  The original chocolate chip cookie recipe this is based off of is from Little Old Lady Recipes.  It really is such a charming little book.  Tried and true recipes from grandmothers are included alongside delightful portraits photos of grandmas.  I made some adaptations and have included these below.


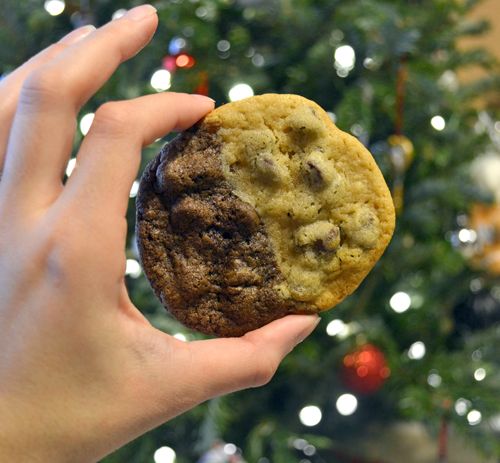
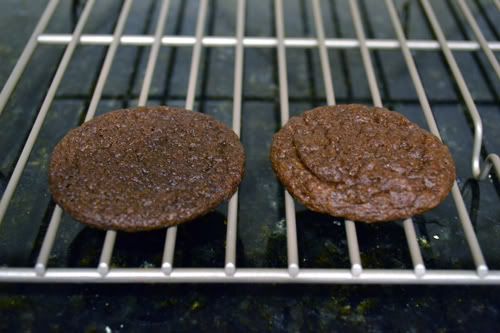
Side by Side Chocolate Chip Cookies, adapted from Little Old Lady Recipes
Ingredients:
1 cup + 2 Tablespoons all purpose flour
3 Tablespoons Cocoa Powder
1/2 tsp baking soda
1/2 tsp fine sea salt
1/2 cup unsalted butter, room temp
1/3 cup granulated sugar
1/2 cup light brown sugar
1 large egg, room temp
3/4 tsp vanilla extract
3/4 cup chocolate chips

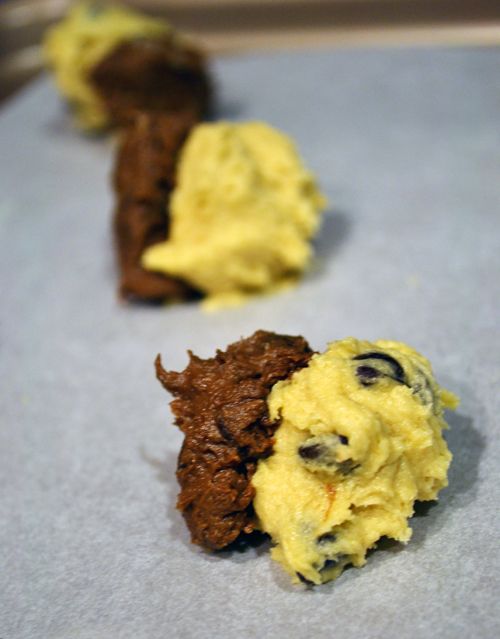
Preheat the oven to 325, and line two cookie sheets with parchment paper.
In the bowl of an electric mixer, cream together the butter and sugars.  Add the egg and vanilla.  Then, add baking soda, and salt.  Add 1 cup of the flour and mix until just incorporated.  Remove half of the dough from the bowl, and set aside.  In the electric mixer, add the remaining 2 tablespoons flour and half of the chocolate chips.  Mix until just incorporated, then drop by the tablespoon onto the prepared cookie sheets.  Now, add the reserved half of the dough back into the stand mixer bowl.  Add the cocoa powder and the remaining chocolate chips.  Drop by the tablespoon onto the cookie sheet so that each standard chocolate chip cookie dough ball has a double chocolate chip cookie dough ball beside it.  With your finger, make the two dough balls touch.  Bake for 8 - 12 minutes or until cookies begin to brown at the edges.  Remove to rack to cool.  


Thursday, December 22, 2011

Christmas Tree Meringue Pops & How-To Video


Need an idea for a very quick, unique Christmas dessert?  Our Round Cake Pop Stand turned these simple little meringue bites into an impressive Christmas display.  All it is is a simple meringue piped into a tree shape using a star tip.  The tree is topped with an edible star decoration and they're baked. Voila!  I'll bet the Christmas parties you're going to haven't seen a meringue pop display like this one :)  


I recommend inserting the lollipop stick while the meringues are still warm (and haven't hardened all the way) to make your life a lot easier.  


Christmas Tree Meringue Pops, from adapted from Penguin Says Feed Me
Ingredients:
2 egg whites
125 grams granulated sugar
A pinch of vanilla extract
Green food coloring
Star shaped edible decorations
Lollipop Sticks
Round Cake Pop Stand


Preheat oven to 250 F. Beat egg whites until soft peaks form. Add in the vanilla and beat to incorporate.
Gradually, while beating, add the sugar until glossy, firm peaks form. Once the sugar has been incorporated, add the green food colouring until the desired colour is achieved.  
Scoop the meringue mixture into a piping bag fitted with a star tip.  Pipe dollops of meringue onto parchment lined cookie sheets, keeping the bases of the trees a little over the size of a quarter.  Press a star decoration into the top of the meringue tree.   
Bake for 35 - 40 minutes.  While meringues are still warm, use a clean awl to gently make a hole in the bottom of the meringue.  Be careful!  These guys can crack.  Insert stick in the hole and put the stick on the Cake Pop Stand.  


Check out this video of Daniel, the piping expert, making some meringue Christmas trees:


Friday, December 16, 2011

Gingerbread Cake Bites with Lemon Frosting


Around this time of year about 5 or 6 years ago, a neighbor brought over a platter of homemade petit fours for the holidays.  It had a few different flavors of cake cut into adorable little squares, each topped with a different type of frosting. I can't remember anything that was on that platter besides one: gingerbread cake with lemon frosting.  I only ate one of the tiny one inch cake bites, but it was so good I still remember it to this day.  

When I got word of Hodgson Mill's holiday recipe contest, "Have a Grain Holiday!" I felt short on good ideas.  I tried out a few different recipes using both their Bread Flour and their Whole Wheat flour but I wasn't thrilled with anything.  Finally, I thought about those gingerbread cake bites and I started trying to make my own version of the bite sized dessert.  I don't know how these would compare to those little bites from a few years ago, but these are pretty delicious.  The gingerbread cake is spicy and moist, and the tangy lemon frosting serves is a nice complement.  Plus, since it uses Hodgson Mill's Whole Wheat Graham flour, it is nutritious, too.  With this type of flour, "the entire natural bran and germ are stone ground, preserving all of the grain's natural nutrients and great taste, with no artificial colors, flavors, or preservatives." 

Gingerbread Cake Bites with Lemon Frosting, serving size: 40-50 bite sized squares.
Preparation time: approximately 2 hours
Ingredients:
1 ½ cups Hodgson Mill Whole Wheat flour
½ cup cornstarch
1 teaspoon baking powder
¾ teaspoon baking soda
½ teaspoon fine sea salt
1 teaspoon ground ginger
¼ teaspoon cinnamon
¼ teaspoon grated nutmeg
¼ teaspoon cloves
a pinch of ground pepper
¾ stick of unsalted butter (6 Tablespoons), room temperature
2/3 cup brown sugar packed
¼ cup molasses
¼ light corn syrup
1 egg, beaten
½ teaspoon pure vanilla extract
½ cup boiling water
2 Tablespoons milk

For the Gingerbread Cake:
Spray a 9 x 13 pan with nonstick spray and line with parchment paper and preheat the oven to 325 F.
Mix the flour, cornstarch, baking powder, soda, salt, spices and pepper together and set aside.
In the bowl of an electric mixer, cream the butter.  Gradually add the brown sugar and cream thoroughly. Beat in molasses and corn syrup.
In a separate bowl, beat the egg until foamy.  Then, add it to the butter mixture. Stir in the vanilla.
Add the dry ingredients to the creamed mixture and mix just until combined, being careful not to overbeat. 
Slowly, pour in the boiling water and the milk.  Mixture will be very runny.  Pour the mixture into the prepared pan and spread with a spatula.
Bake for about 30-35 minutes or until a cake tester comes out clean.  Allow to cool all the way, and then chill in the refrigerator.

For the Lemon Frosting:
2 sticks unsalted butter, softened
zest from ½ a large lemon
juice from ½ a large lemon
1/2 teaspoon pure vanilla extract
3 cups powdered sugar
Lemon peel for garnish, optional

In the bowl of an electric mixer, cream the butter until light and fluffy.  Add the zest and vanilla.  Slowly add the powdered sugar.  Add the lemon juice and beat on medium-high for 5 minutes.  When the cake is chilled and  slightly firm to the touch, spread the frosting on the cake with an offset spatula.  Using a pizza cutter, cute the cake into small squares.  If desired, top each square with a small strip of lemon zest to garnish.  


Wednesday, December 14, 2011

Contest Winner!

And the winner is...#5 comment, Melissa! Melissa said "My mom's date and nut bread spread with cream cheese. If she doesn't make it, I have no doubt some family members would cry!" Congratulations Melissa! You have 24 hours to claim your prize.  Please either email me at: info@thesmartbaker.com or leave a message on this post with your email address.  


Holiday baked goodie coming soon to Ice Cream Before Dinner using Hodgson Mill's high-quality flour!

Sunday, December 11, 2011

Hodgson Mill and a Giveaway

Good ingredients really makes all the difference in a recipe.  People always talk about using high quality chocolates and extracts when baking, but rarely do people talk about the type of flour they use.  After the first time I bought a higher quality flour than I had used in the past, I never went back.  


Recently, Hodgson Mill began a holiday recipe contest.  Stay tuned for a holiday treat recipe using their wonderful flours coming up on Ice Cream Before Dinner very soon!  In addition to a new holiday recipe, I'll also be hosting a giveaway for $25 to Hodgson Mill's online store!!  


To enter to win, simply post a comment on this blog post describing your family's favorite holiday treat recipe.  


For a second entry to win, write a post on Twitter or Facebook linking to this blog post saying: "I just entered to win a $25 gift certificate to Hodgson Mill at Ice Cream Before Dinner!"  Then, leave a second comment on this post saying you did so.


The contest will end Tuesday, Dec. 13th at Midnight and the winner will be contacted Wednesday.

Sunday, December 4, 2011

The Smart Baker at Cocoa Village Craft Fair

The Smart Baker blogging to you live from the Cocoa Village Holiday Craft Fair!  


You mean you don't have a fake oven?

Our towers even look nice with store bought cupcakes!  So if you're short on time planning your holiday party, you can still have an elegant dessert display.

Wednesday, November 23, 2011

Best Oreo Stuffed Brownies


Brownies with Oreos baked right in the middle have been floating around the internet for a while now.  Being huge fans of both, I'm not sure why I haven't got around to making them until now.  It is a genius idea to bake something delicious in the middle of something else delicious.  Plus, it's such a terrific and easy way to jazz up a boxed mix or your favorite from scratch brownie recipe to surprise your taste testers.  


I used a new-to-me brownie recipe: Best Cocoa Brownies.  The recipe on Epicurious says "Cocoa brownies have the softest center and chewiest candylike top 'crust'".  I'd have to agree.  They were super fudgey, soft and moist but still had that slight crisp to the top.  I used Hershey's Special Dark cocoa powder for a super chocolatey taste.  

Best Oreo Stuffed Cocoa Brownies adapted from Epicurious
Ingredients:
10 tablespoons (1 1/4 sticks) unsalted butter
1 1/4 cups sugar
3/4 cup plus 2 tablespoons Hershey's special dark cocoa powder
1/4 teaspoon fine sea salt
1/2 teaspoon pure vanilla extract
2 cold large eggs
1/2 cup all-purpose flour
16 double stuf oreos

Directions:
Preheat the oven to 325°F. Line an 8 inch square baking pan with square pre-cut parchment paper.
Combine butter, sugar, cocoa, and salt in the top of a double boiler with the water beneath barely simmering. Stir from time to time until the butter is melted and the mixture is mixed. Remove the bowl from the skillet and set aside briefly until the mixture is only warm, not hot.
Stir in vanilla. Add the eggs one at a time, stirring vigorously after each one. When the batter looks thick, shiny, and well blended, add the flour and stir until you cannot see it any longer. Spread half of the batter in the lined pan.  Arrange oreos in a single layer on top of the batter.  Pour the remaining brownie batter on top of the oreos and spread to cover them.
Bake until a toothpick plunged into the center emerges slightly moist with batter, 20 to 25 minutes. Let cool completely on a rack.
Transfer the brownies to a cutting board. Cut into squares.


Speaking of amazing, did you see the wooden bowl my oreo brownies are styled in?  One of many things I love about doing local craft shows for The Smart Baker is getting to meet other entrepreneurs.  At our most recent show in October, our booth was next to that of a wood turner, Berkshire Bowls. His Etsy site says, "At Berkshire Bowls we try to make all of our pieces from material that was brought down by natural causes. Each time there is a wind storm, ice storm or other means, I am looking for the material for our next piece".  So they're not just beautiful, they're very green, too.  He boasts such a wide range of products such as pens, boxes, puzzles, bowls of all shapes and sizes.  I just couldn't resist this adorable little bowl.  We're currently working with Scott, the owner, on some very "smart" kitchen items.  I can't wait to share them with you!

Check out Berkshire Bowls' website for more information.  I bet there's a bowl or two that you won't be able to resist either.  


Tuesday, November 8, 2011

Glass Cleaner Foaming Spray


I started off this post by writing about how I love to bake, but that my domesticity doesn't extend into the realm of cleaning.  But really, does anyone like to clean?  Does anyone enjoy cleaning counter tops of grime, eliminating streaks and water spots from bathroom mirrors, or wiping away dirt?  I'd be willing to guess that most people do not find joy in these household chores.  


Recently, Stanley Home Products gave me the opportunity to try out their Glass Cleaner Foaming Spray.  Out of all the rooms to clean, the bathroom is probably my least favorite.    Since this cleaner stuff claims to be non-streaking, fast-drying, water-repeling and grime-guarding, why not give it a try?  


I used it on the bathroom counters first.  A quick spray on the counters, an easy wipe with paper towel, and the counter surface was spotless.  It worked on the mirrors too, and left no streaks.  The foam must do all the hard work, because all I needed to do was gently wipe away the foam and the dirt went with it.  Overall, it made the pretty un-fun task of cleaning the bathroom quicker and easier and I'll definitely be using it again.  You can purchase it online for $6.49 at Stanley Home Products.  

Tuesday, November 1, 2011

Club: BAKED - Caramel Apple Monster Cake

On Sunday we celebrated Halloween with the family.  I saw this Monster cake and really wanted to make it, so when I saw we were baking the Caramel Apple Cake with Club Baked, I thought how perfect!  I'd turn the Caramel Apple Cake into this furry little monster.  


I don't have 3 round cake pans, so I made 2 nine-inch cakes, and split each into two - creating a four layer cake.  Also, I cheated with the frosting.  I saw mixed reviews of the frosting recipe on the Club Baked P&Q page, so, being short on time (I made lots of cake balls and puff pastry intestines, too... pictures to come soon), I decided to make a shortcut and just whipped up a batch of my favorite buttercream frosting - adding 1/3 cup of store bought caramel topping for ice cream.  

First we crumb-coated.  Then we (I say WE because the husband did all of the fur piping! I should really say "HE!")  used a grass tip (flat tip with several small holes in it) to pipe the orange fur in concentric rings.  His mouth is black licorice, and his teeth are made of Candy Quik that I piped into triangles on parchment, and then let harden before transferring to the monster.  
His eye balls are devil's food cake pops dipped in vanilla candy quik.  The orange bit is a Candy Melt wafer with black food coloring gel painted on with a paint brush, and a dab of Candy Quik for the little while shine.  We painted the veins on with red food coloring gel and a paintbrush.  It was time consuming, but fun!

As for the cake, everyone who tried it loved it.  My nephew had two bowls full!  What wasn't eaten at family dinner was thoroughly enjoyed at work the next day.  

Thanks for Melissa of Lulu the Baker for selecting this recipe and hosting this week!  What a great pick for this time of year, such a nice Fall spicey cake. Be sure to visit Club Baked and check out how the other Club Baked bakers did with this Caramel Apple Cake.


Saturday, October 22, 2011

Vanilla Rich Chocolate Chip Cookies


A while back, I was catching up on my blog reading and came across Vanilla Rich Chocolate Chip Cookies on My Tasty Treasures.  It caught my eye because Daniel is a lover of vanilla, so I bookmarked to make in the near future.  That night, I was flipping through one of my mother in laws magazines as saw the same recipe in an ad for McCormick's vanilla extract.  I took it as a sign and made them that night.  SO glad I did because it is hands down, my favorite chocolate chip cookie recipe I've ever made to date...  soft and chewy and full of vanilla with just the right amount of salt in it so that you could taste it but it wasn't overpowering.  They stayed fairly thick and didn't spread out too much.  The recipe made quite a large batch but um... they didn't stick around that long.


Vanilla Rich Chocolate Chip Cookies from My Tasty Treasures
Ingredients:

3¼ cups flour
1 teaspoon baking soda
¾ teaspoon salt
1 cups butter, softened
1¼ cups granulated sugar
1 cup firmly packed light brown sugar
2 eggs
4 teaspoons Pure Vanilla Extract
1 package (12 ounces) semi-sweet chocolate chips

1. Preheat oven to 375°F. Mix flour, baking soda and salt in medium bowl. Set aside. In the bowl of an electric mixer, beat butter and sugars in large bowl on medium speed until light and fluffy. Add the eggs and vanilla; mix well. Gradually beat in the flour mixture on low speed until well mixed. Stir in chocolate chips.

2. Drop by rounded tablespoons (I used a 1 1/2 Tablespoon cookie scoop) about 2 inches apart onto parchment-lined baking sheets.

3. Bake 8 to 10 minutes or until barely beginning to brown at the edges. Cool on baking sheets 1 minute. Remove to wire racks; cool completely.

Saturday, October 8, 2011

Homemade Pumpkin Pie Spice


Nothing says Fall like pumpkin flavored things.  The coffee shops are filled with pumpkin lattes, delis have pumpkin muffins, even ravioli are filled with pumpkin in the Fall.  And I love it!  Towards the end of the summer, I never can wait for Fall to get here to eat all of the pumpkin goodies.  


That being said, as much as I love pumpkin-flavored things, I've never bought pumpkin pie spice.  And today in Central Florida, it's like a monsoon.  I'm talking trees down in my neighborhood and water coming up through my tiles in the living room (but that's another story).  Not the kind of weather that makes you you want to go to the store solely to buy pumpkin pie spice.  So what do you do if you're stuck in the house and craving pumpkin goodies, with no pumpkin pie spice?  Make your own, of course!  I found this recipe for Pumpkin Pie Spice on My Baking Addiction, and I had all of the spices on hand.  You probably do, too!


Homemade Pumpkin Pie Spice from My Baking Addiction
Ingredients:
3 Tablespoons ground cinnamon
2 teaspoons ground ginger
2 teaspoons nutmeg
1 1/2 teaspoons ground allspice
1 1/2 teaspoons ground cloves

Combine all spices in a small bowl and whisk to combine.  Use a funnel to pour into a small air tight jar.  


Saturday, October 1, 2011

Club: BAKED - A Tale of 2 Pumpkin Muffins

Today is October 1st.  Break out the pumpkin!  If you're looking for an excuse to buy pumpkin now that its on the shelves, try these muffins.  I altered it (drastically) from the savory Pumpkin Cheddar muffins recipe that was chosen as this week's baked goodie for Club Baked, and I'm happy with the results.  In addition to my savory to sweet adjustment, I also split my batter in half and made two varieties: Espresso Pumpkin Muffins and Pumpkin Pie Muffins.  I'm not sure which one I love more!  I've posted my recipe below as it is so different from the original, but if you're interested in the savory Pumpkin Cheddar version, see Billie of the blog Chocolate & Chakra - the host of this week's recipe.  Thanks for hosting and picking this wonderfully Fall recipe, Billie!


Pumpkin Muffins two ways: 1 with Espresso and 1 with Pumpkin Pie spice
Yields 15 cupcake-sized muffins
Ingredients:
1 cup canned pumpkin puree
3 tablespoons light sour cream
2 large eggs, room temp
1 stick unsalted butter, melted & cooled
2 cups all purpose flour
1 1/2 teaspoon baking powder
1/2 teaspoon Pumpkin Pie spice (home-made!)
1/2 teaspoon Espresso powder
1/2 teaspoon fine sea salt
3/4 cup packed light brown sugar
3/4 cup granulated sugar + extra for sprinkling


Directions:
Preheat oven to 400 F.  
In the bowl of an electric mixer, combine pumpkin and sour cream.  Add the eggs and butter and combine. 
In another bowl, add the flour, baking powder, salt and sugars, and whisk to combine.  Add to the pumpkin mixture.  
Divide the batter in half.  In one half of the batter, add the pumpkin pie spice.  In the other half, add the espresso powder.  Or, if you want an entire batch of 1 variety, simply double the amount of that spice and omit the other.  
Put in standard sized cupcake tins lined with cupcake liners.  Sprinkle the tops with granulated sugar.  
Bake for 14 - 17 minutes, or until a cake tester inserted into the center comes out clean.  Serve warm!


Oops! Who ate those?


Visit the other Club Baked bakers to see how their Pumpkin muffins came out!  I can't wait to see how the savory version tastes - I was too scared to try it!  

Friday, September 16, 2011

Vintage Cookbooks

I was recently given a whole bunch of vintage cookbooks.  The new facility we're renting had two big bookshelves of cookbooks that they no longer wanted, and said we could take whichever ones we want!  It was hard to not take them ALL, but I selected about 8 or 9 of them.  I saw "Joy of Cooking" and since I don't own that yet, I had to take that one!  But I also looked for the kind that seemed like compilations of recipes from local people.  I feel like these could be the kind of thing that people contribute their family's favorite recipes to.  I found quite a few books that are collections of recipes from local church members and women's organizations.  I can't wait to start baking and find the great recipes hidden in these old books!  


Have you ever found any recipe gems hidden in old cookbooks?  When I started flipping through the books after I got them home, I found something else hidden in one of these old cookbooks:
An old Publix receipt!  Thanks to Daniel for being my hand model.  Wouldn't you love to go to the grocery store and come home having spent less than $1? :) 

Thursday, September 15, 2011

Bananas Foster Fritters - Club Baked

I love banana bread.  My grandmother used to make it all the time when I was young, and me and my sister would always look forward to having slices when we got home from school for several days after.  When I moved to Florida, she gave me her recipe.  Now, at any given time, if you were to take look in my freezer you'd find a zippy bag full of ripe bananas just waiting to be baked into something.  But very rarely do I ever actually make banana bread.  For some strange reason, the husband doesn't love banana bread.  He doesn't dislike it, but if I were to make it, it'd either sit on the counter until it went bad or until I ate the entire thing by myself. 


...but he does love doughtnuts, zeppoles and other similar blobs of fried doughy goodness.  When it was my turn to host Club Baked - I chose the Bananas Foster Fritters to make both of us happy.


These little fritters were very well received - and very easy to make!  I made the dough and sauce in advance and chilled it in the fridge until after dinner, since I knew they were best served right away.  After dinner we heated up the oil, ice-cream scooped some dough into the hot oil and a few minutes later we had some hot, fresh banana fritters.  


My one issue was with browning.  I watched my oil temperature very carefully, but they still browned far too quickly.  It probably had something to do with the small size of my fritters. I got about 13 fritters and the recipe said 6 - 10.  At 375 F, they needed barely 1 minute per side until they were done on the outside.  Even at 355 -  360 degrees, they still didn't need a full 2 minutes per side like the recipe said.  But for some reason, they were still a tad underbaked in the middle. Oh well - that didn't take away from how much we all enjoyed them.


I opted for a different rum sauce than the one in the book (because of the ingredients I had on hand).  We loved the rum sauce, and I think it really finished these off nicely.  I'm including both recipes below.  


Bananas Foster Fritters from Baked Explorations
Ingredients for Rum Dipping Sauce (recipe I used is below):
4 Tablespoons unsalted butter, cut into 1 inch cubes

1/3 cup firmly packed dark brown sugar
1/3 cup heavy cream
1 teaspoon banana liqueur (or pure vanilla extract)
2 Tablespoons dark rum
Pinch cinnamon (optional)


For the fritter dough:
1 1/4 cups all purpose flour (+ more if needed)
3 Tablespoons firmly packed dark brown sugar
1 teaspoon baking powder
1/2 teaspoon salt
1/4 teaspoon ground allspice
1 teaspoon cinnamon
3 medium ripe bananas
1 tablespoon dark rum
1 teaspoon banana liqueur (or pure vanilla extract)
1 Tablespoon unsalted butter, melted and cooled
Vegetable oil for frying
1/4 cup confectioners sugar


Make the rum dipping sauce:
In a medium saucepan over medium heat, stir the butter and sugar together until smooth. Add the cream and bring to a boil. Remove the pan from the heat and stir in the liqueur, rum and cinnamon if using. Set aside until serving time. (The sauce can be made ahead. Allow it to cool, then cover it tightly in plastic wrap and refrigerate. Rewarm it over low heat in a saucepan or microwave it in short 15 second blasts before serving).


Make the fritter dough:
In a large bowl, whisk together flour, brown sugar, baking powder, salt, allspice, and 1/2 teaspoon of the cinnamon. Use your hands to rub the chunks of sugar into the flour mixture and whisk again (it is ok to have a few chunky sugar pieces remaining).


In another large bowl, mash the bananas with your hands or a heavy spoon and stir in the rum, liqueur and butter.


Use a eubbwe spatular to fold the dry ingredients into the banana mixture. The mix should look wet, but it should hold its shape when scooped into a small ball.  If dough is too thin, keep folding in flour 1 tablespoon at a time until it stiffens up.  Refrigerate the dough while the frying oil heats up and you prepare the sugar topping.


Pour enough oil into a deep skillet to fill it 3/4 inch to 1 inch deep.  Slowly heat the oil over medium-high heat until it registers 375 degrees F on a deep-frying thermometer.


While the oil heats, in a small bowl, whisk together the confectioner's sugar and remaining 1/2 teaspoon cinnamon. Set aside.


Fry the fritters:
Line a plate with double layer of paper towels and set it near your work area.


Using a small spatula and a small spoon, two spoons, or an ice cream scoop with a release mechanism, drop heaping spoonfuls of dough into the oil. Do not crowd the skillet. Cook until the fritters have browned on one side, 2 to 3 minutes. Using a slotted spoon or tongs, turn them over to cook for another 2 minutes or until browned. Do not overcook or burn the fritters. Use the slotted spoon to transfer the fritters to the prepared plate and continue frying dough until finished. 


Place the fritters on a serving plate and sift the cinnamon sugar over them. Serve immediately with rum dipping sauce. 


Rum sauce (the one I used), adapted slightly from Epicurious
Ingredients:

6 tablespoons (3/4 stick) unsalted butter
1 cup (packed) golden brown sugar
1/3 cup whipping cream
2 tablespoons light corn syrup
2 tablespoons dark rum


Melt butter in heavy medium saucepan over medium heat. Add brown sugar, cream and corn syrup and stir until sugar dissolves. Boil 1 minute. Remove from heat. Mix in rum. Boil 1 additional minute.  Cool slightly. (Can be made 1 day ahead. Cover and refrigerate. Rewarm before using.)

See how the other Club Baked bakers did with the fritters by visiting Club Baked's site!  

Thursday, September 8, 2011

Why Parchment is better than Silicone Mats

I used to swear by silpats and other similar silicone mats.  I lined every cookie sheet I could with them.  They're non-stick, they save your cookies by allowing them to come off of the pan without much effort, and they're green.  But gradually, I started to use Parchment more often than silicone mats.  Tonight, my belief that parchment is better than silpats was reconfirmed.  Why, you ask?


This is the same cookie batter, chilled for the same amount of time, baked for the same amount of time.  The one on the left was baked on a cookie sheet lined with a silicone mat, and the one on the right was baked on a cookie sheet lined with a parchment sheet.  I have absolutely no scientific evidence to back this up, but in my experience, cookies always spread more and fall flatter when they're baked on silicone.  Those baked on parchment always seem to maintain their thickness much more, and have a much better texture.  Maybe silicone is too non-stick and the cookie dough spreads out too easily, making it flatter?  I have no idea why.  But every time I give silicone another chance, I see why I stop using it and switch to parchment sheets.  I hate it when I ruin good cookie dough!


Oh well.  I ruined a few cookies, but I learned that I should only use my silpats when I'm baking items that I don't need to worry about spreading.  For everything else, I'll stick with my perfect parchment

Wednesday, September 7, 2011

Lightest, Easiest, Quickest Cherry Cheesecake recipe ever


Have you ever prepared a recipe, and has it turn out totally different from what you were expecting?  But you wound up really liking it?  I was a bit careless while preparing this recipe and made a little mistake.  As a result, this quick and easy Cherry Cheesecake recipe produced a unique, light texture that I really wasn't expecting from a no-bake cheesecake.  The airiness made it actually very little like cheesecake and more like a mousse.  But everyone who tasted it absolutely loved it.  It won't be replacing my favorite cheesecake recipe just yet, but when you want something quick and easy (no baking involved!) and light, this might be the cheesecake for you.  (And no, by "light" I do not mean low in calories. Sorry!).  


Quick and Easy Light Cherry Cheesecake, adapted from Nigella Lawson
Ingredients:
1 1/4 cups graham cracker crumbs
2 tablespoons sugar
3/4 stick unsalted butter, soft
10 ounces cream cheese, room temperature
1/2 cup powdered sugar
1 teaspoon pure vanilla
1/2 teaspoon lemon juice
1 cup heavy cream
1 (1o-ounce) jar black cherry spread (or conserves)


Grease an 8 inch springform pan.  
Pulse the graham cracker crumbs in a food processor turning it into crumbs, then add the sugar and butter.  Pulse again to make the mixture clump.  Press the graham mixture into the bottom and slightly up the sides of the springform pan.
Beat together the cream cheese, sugar, vanilla and lemon juice until it is smooth.
Whip the heavy cream until it is the consistency of whipped cream (**See Note Below)
Fold the cream into the cream cheese mixture.  Spoon the cheesecake filling on top of the graham cracker crust and smooth with an offset spatula.  Refrigerate for 3 hours to overnight.
When ready to serve, un-mold the cheesecake and spread the black cherry conserves over the top.


**(This is where I strayed from Nigella's recipe.  She only lightly whipped her cream, but I got careless and overbeat it.  I think this is what added to the lightness of my cheesecake.  If you want it light, beat the cream until stiff peaks form.  If you'd like a more traditional texture, only lightly beat the cream).   

Tuesday, September 6, 2011

Red Velvet Brownies with Cream Cheese Icing


There have been a few different Red Velvet Brownie recipes floating around the internet for a little while.  One that I've had on my To-Do list for a long time now comes from How Sweet It Is.  I finally decided to put this one at the top of my "Things to bake" list, but I didn't want to make the White Chocolate Frosting that goes with it.  First, I don't love white chocolate.  Second, I don't know about you but I always dread having to melt down white chocolate.  It always seems to be temperamental for me.  It usually winds up chunking up and looking less than tempting.  So, I decided to skip it and go with a traditional match for Red Velvet... Cream Cheese Icing.  I whipped up my favorite cinnamon bun cream cheese frosting and spread that on top of the bars.  How'd it turn out?  Well, I did get a comment that night, "This is the best thing I've ever put in my mouth".  I'd say it went over well.  The brownies found that perfect medium between the fudgey chocolatiness of a brownie, and the only-barely-cocoa-ness of Red Velvet.  I'm glad I went with the Cream Cheese Icing because it really finished these off perfectly.


Red Velvet Brownies with Cream Cheese Icing, adapted from How Sweet It Is
Ingredients:
1/2 cup butter, room temperature
1 1/2 cups sugar
2 eggs, room temperature
2 teaspoons vanilla extract
1 1/4 cups all purpose flour
1/4 teaspoon salt
3 tablespoons cocoa powder
red food coloring gel
2/3 cups chocolate chips (optional)

Preheat the oven to 350.
Line an 8 x 8 cake pan with parchment (on sale now!)
In a medium bowl, combine flour, salt and cocoa powder.
In the bowl of an electric mixer, cream butter and sugar until fluffy. Add eggs one at a time, then add remaining teaspoon of vanilla. With the mixer on medium speed, add in the flour mixture.  Add food coloring and stir until incorporated.  Stir in the chocolate chips if using.  
Spread in the 8 x 8 pan. Bake for 25-30 minutes, or until toothpick inserted in center comes out clean. Let cool almost entirely before frosting.

My favorite cream cheese cinnamon bun frosting recipe:Ingredients:
2 ounces cream cheese, room temperature
4 tblspn unsalted butter, softened
1.5 c confectioner's sugar
1/2 tsp pure vanilla extract

Beat cream cheese and butter together until mixed and fluffy. Add sugar, mix until incorporated. Add vanilla and stir to combine. Spread on the barely warm brownies.


LinkWithin

Related Posts with Thumbnails