Recent Posts

Showing posts with label kitchen gadget. Show all posts

Tuesday, January 25, 2011

Upcoming Reviews!


Check out this cool little item my mother in law got for me:  Cupcake Plunger by Chicago Metallic.  This cupcake plunger takes out the center of a cupcake so you can put filling inside.  It says you can put the plunger inside the cupcake, take out the core, and then pop it out of the plunger.  Voila, a cored cupcake - ready to fill!  It also says you can use the plunger to get the perfect sized amount of solid filling to put inside the cupcake - such as ice cream or thick buttercream.  I'm thinking it would make fun two-flavored cupcakes by making vanilla cupcakes with chocolate cake centers and vice versa.  Plus, I'm really excited at the notion of making ice cream cupcakes in a much easier fashion than I have in the past.  They'd probably look prettier too!  Mmm, or brownie bites filled with peanut butter... As you can tell, I'm really excited to try this little gadget out.  What treats would you create with it?  After I use it I'll be sure to review how it worked out for me.  


Speaking of gadgets, I recently heard from CSN Stores, which means its time for another review!  CSN stores is a giant online retailer, with over 200 different online stores carrying... well... everything.  Seriously!  CSN has everything from swing sets and kids toys, to home decor, cooking and baking supplies, and shoes.  Everything!  Chances are if you're looking for it, CSN has it.  I may be 25 years old with no backyard and no children (besides a shih-tzu) but how cool are these swing sets for kids?  Don't even get me started on these giant water trampolines.  I seriously want one.  
 On top of having a wide selection, their pricing really is great.  And something that is very important to me when looking to buy something new, they also have customer submitted item reviews for their products, too.  I rarely buy anything without reading others reviews of it first!  

So stay tuned for an upcoming review or two of items from CSN Stores.  And in the mean time, check out this video: Trampoline Dodgeball.  You're never too old for some trampoline dodgeball.  

Friday, August 27, 2010

Homemade White Whole Wheat Pasta

Photobucket

This coming Monday, I make the transition from years and years of being a student to now being in the teacher position.  I'm in my last semester of my graduate degree.  Come December I'll have a masters degree in Art Education and I'll be fully certified to teach Art in Florida.  Since it is my last semester, that means full time student teaching/interning - I'll be spending 7 weeks in a High School Art classroom and 7 weeks in an Elementary school classroom.  I'm very excited, anxious, eager, nervous, and a whole lot of other adjectives.  I know I'm going to learn SO much about how to teach and I'm really looking forward to this experience!

That being said, the weeks leading up to internship have been filled with lots of things I know I won't have the time to do during the school year.  I've been doing lots of wedding things (Just 57 days until the Big Day!), like putting together favors, finalizing details, dress fittings, hair trial runs, and more.  I've also been spending a LOT of time in the kitchen cooking and baking because I know sadly I won't have as much time to do those things as I do now.  

I know I don't talk about Cooking very often on this blog, but I do actually like to cook very much.  Maybe that's because dinner doesn't stick around long enough to get photographed (it usually get devoured as soon as it is done).  Or maybe it's because chicken parmigiana just doesn't look as cute in pictures as a stack of brownies does.  But my-really OUR because the wonderful fiance helped tremendously with this one-latest cooking escapade definitely warrants a blog post.  

For my bridal shower, I got a Pasta Excellence Set for the KitchenAid mixer along with a "Greatest-Ever Pasta Cookbook"!  I was SO excited to get this - it comes with a pasta roller, a spaghetti cutter, a thick noodle cutter, an angel hair cutter, a fettucini cutter, and a ravioli maker.  The cookbook I got along with it is perfect for beginners - it explains every step of the pasta-making process in detail and shows pictures at each stage.  Very helpful when you're attempting this task for the first time!  We made the book's Basic Egg Pasta Dough (with some slight alterations which I'll include below) for our first Pasta-Making Session.

Basic White Whole Wheat Egg Pasta adapted from the Greatest-Ever Pasta Cookbook
4 Cups White Whole Wheat flour
1 1/2 Cups All Purpose Flour (both flours together should weigh 600 grams)
6 eggs, room temperature
2 tsp sea salt
1/4 Cup water, for use as needed

1. Sift the flours together and make into a mound on a clean work surface.  Use your fingers to make a deep well with high sides in the center of the mound.  
Photobucket

2. Crack the eggs into the well and add the salt.  With a fork, mix the wet ingredients together and slowly start incorporating flour from the sides of the mound into the wet ingredients.  Be careful to not break the sides of the well or spill the wet ingredients over the sides of the mound or you'll have a big mess.  Be patient, this is going to take a while.
Photobucket

3. When enough flour is mixed in that the mixture in the center is no longer liquid, use your hands to work the ingredients together into a sticky dough.  Get all of the sticky mixture off of the work surface and work into the dough ball.  If the dough seems too dry, start adding water by the Teaspoonful into the dough.  If it is too moist (a problem which I didn't have), add some flour.  

4. Form a rough ball and knead it.  Take the heel of your hand, and push the dough away from you.  Fold it back on itself and repeat.  Be sure to turn the dough and continue kneading every few minutes.  After several minutes of kneading like this, you could throw it in your KitchenAid mixer with the dough hook attachment and knead it for a few minutes to help form the dough.  You will likely still need to knead it by hand a bit after this, but it helps speed up the process.  Thorough kneading is very important!  Your dough isn't kneaded thoroughly unless it is very smooth and has some elasticity.  This is the hardest step!

5. Wrap the dough in plastic wrap and allow to rest for 15-20 minutes at room temperature.  It will be ready to roll after this waiting period. *If you plan on making ravioli, now would be a good time to prepare your filling!

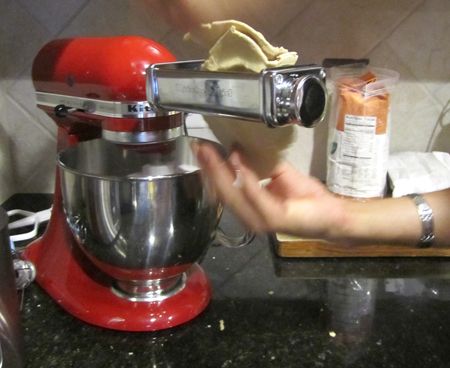
Now, break out the Pasta Roller!
Use it on the thickest setting at first (#1).  Break off a chunk of dough slightly larger than a golf ball.  Use your fingers to press it down into a rough sheet.  Put it through the pasta roller on the widest setting a few times.  Next, take it to the next setting on the pasta roller - a little bit thinner (#2).  Run it through this next setting a few times.  Then, fold the dough in half and insert the folded end into the roller.  Run it through a few times like this before moving it up to the next setting (#3) and repeat all the way until the dough is rolled out at the #4 setting.  If the dough is forced to go through the roller on too-thin of a setting when it isn't ready, it will break apart and will likely get too dry to be able to be used at all (we learned this the hard way).  As you make pasta sheets, lay them out on your clean work surface and cover with plastic wrap as you make the rest of your sheets.
Photobucket

When the dough is at the thickness of the #4 setting, it is ready to be made into pasta.  We made it into a variety of pastas - 
Some spaghetti:
Photobucket

As you cut the spaghetti, put on a lined cookie sheet and toss with flour to prevent the dough sticking together.  
Photobucket

Roughly form little "nests" with the spaghetti.  
Photobucket

Now you can do one of three things:
1. Allow the pasta to dry for one hour and then throw it in boiling water for around 4 minutes and eat it!
2. Allow it to dry for a couple of hours until it feels a little bit stiff but not as stiff as boxed pasta.  Then, plastic wrap or zippy bag the nests and freeze until ready to use.  You can put the home-made frozen pasta into boiling water for about 4 - 5 minutes and it'll be ready to eat.  Consume within 3 months.
3. Let the nests dry for 24 hours until it feels stiff like boxed pasta.  It can be stored in airtight storage containers in the pantry.  Consume within 3 months.  
Voila! Home-made pasta ready for whenever you want it!

Photobucket

We made lots of ravioli, too:
Photobucket

Photobucket

Photobucket

To make the ravioli is surprisingly easy!  Take a long sheet of pasta dough, fold it in half and insert the folded end into the ravioli attachment.  Using the hand crank, turn the knob one quarter turn to feed the pasta sheet. Take the filling scoop and insert 1 - 2 scoops of the filling of your choice (2 ideas below!).  As you turn the hand crank, the filling automatically fills in the little pockets of the ravioli and seals the edges.  A little filling goes a long way, so don't put too much in.  If you get to the end of the dough and there is filling left, it might get a little messy.  :)
Once the sheet is completely through the ravioli maker, tear the sheets of ravioli apart at the perforations.  Lay the ravioli out on a cookie sheet lined with a clean dish towel.  Allow to dry for one hour before cooking.  The raviolis will only take about 4 - 5 minutes in boiling water to be done and ready to eat!  (Or you can freeze the little raviolis after their initial drying period and boil them up whenever you want them).  

With ravioli fillings, you can get pretty creative.  Just one thing to keep in mind is that fresh ravioli only need to boil for 4 - 5 minutes, so anything you put in should be fully cooked.  In our first ravioli making sessions, we made two fillings:

Spinach and Ricotta Cheese Ravioli Filling:
3 Tblspn unsalted butter
6 oz fresh spinach, washed and shredded
1 Cup ricotta cheese
1/3 Cup grated Parmigiano-Reggiano cheese
a pinch of nutmeg
1 egg, room temp
sea salt and pepper to taste

Melt the butter in a small saucepan.  Add the spinach, salt and pepper and cook for 6 - 8 minutes on medium heat.  Stir frequently until the spinach is wilted.  Increase the heat to high and stir for a few minutes to dry out the spinach a little bit.  Transfer to a mixing bowl and allow to cool.
When cool, add ricotta, grated cheese, and nutmeg.  Mix well, taste for seasoning.  Then when you're happy with the seasonings, add the egg and mix well.  It is ready to be put into ravioli!

Spicy Sausage and Spinach Ravioli Filling:
1 Tblspn olive oil
2 spicy italian sausage with the casings removed
1 Cup ricotta cheese
3 oz fresh spinach, washed and shredded
1 egg, room temp
Grated cheese, salt, and pepper to taste

Over medium heat, cook the sausage in a small pan until meat is browned and cooked thoroughly, and a lot of the liquid has cooked away.  Remove to a mixing bowl and allow to cool.
Add the olive oil and spinach to the still hot pan and cook, covered, until wilted.  When it has wilted, gently squeeze some of the liquid out of the spinach and discard the liquid.  
Mix the sausage, spinach together with the ricotta, grated cheese.  Add grated cheese, sea salt and pepper and taste for seasoning.  If you're happy with the seasoning, add the egg and mix well.  It's ready to be put into your raviolis!

So that I could get a feel for the taste of the ravioli, I didn't want to cover it in a red sauce.  Instead, I made a simple Browned Butter and Sage sauce.  It is so simple I hesitate to even call it a sauce, but it is soo good.  Browned butter is nice and nutty and has much more depth as a result of browning.  When you add sage and sea salt... you'll just have to try it to understand.

Browned Butter and Sage sauce
3 Tblspn butter
8 - 12 leaves of Fresh Sage, washed and dried
Sea Salt for serving
Grated parmigiano-reggiano cheese for serving

Melt the butter on medium heat and add the sage leaves.  Cook it over medium heat until it browns.  Here is a little tutorial on how to brown butter if you're not familiar. 
When cooking your pasta, save a little bit of the pasta water when straining.  Add the browned butter and sage to the pasta water and pour over your pasta.  Sprinkle sea salt on top of your pasta, add some grated cheese and enjoy!  (Adding sea salt brings out the flavor of the browned butter as well as the sage.  Without it, it'll just taste like.. butter.  So skipping the sea salt is NOT ok!!  You'll be missing out!).  

Photobucket

Here is only our spread of the pasta we made that night:
Photobucket

WHEW, that was a long post.  I suppose it makes sense because the pasta-making was a long process.  But it was a lot of fun.  Actually since then, we've actually made MORE pasta.  I can't wait to play around and make all kinds of different flavors or pasta dough.  I'd definitely recommend this recipe for the ravioli dough as it was nice and simple and really let the flavor of the filling shine through.  However next time I'd probably make something a little more flavorful for the spaghetti and non-stuffed pastas.  But don't get me wrong, it was still delicious. :)

Next post up before Student Teaching starts?  Canning home-made Tomato Sauce!  You'd never guess me and the fiance are in our mid twenties, you'd think we were little old Italian women.  At least we eat well!

Thursday, July 22, 2010

Product Review: Cuisipro Batter Dispenser

Photobucket

Recently, I had the chance to work with CSN Stores and review a kitchen product.  CSN Stores is an online retailer with over 200 online stores!  They have everything you might need for your kitchen, office, backyard, and almost anywhere else you can think of.  They have such a variety of products, they are likely to have whatever it is you're looking for.  Something I enjoy is that each product has an area for people to submit reviews, so before you purchase you can see what others have to say about it.

The product up for review in my kitchen was the Cuisipro Batter Dispenser.  Selling for only $30, it's an affordable addition to your army of kitchen gadgets.  And since it can help for anything from pancakes, waffles, crepes, brownies, cake batter, and other liquidy batters, it's not one of those uni-taskers thats going to collect dust until the one day of the year you need it.

I tried it out on two tasks: making "cupcakes," or brownies baked in cupcake liners, and pancakes.  How did it fare?

1. Ease of Prep: Disassembling the product to fill it with batter was a breeze.  I found that it came open and went back together again very easily.  But since it can't stand on its own upside down, it is a little difficult to fill it with one hand while holding it with the other hand.  I had to have my fiance put the batter in while I held it.  We gave this category: 3 out of 5 stars.

2. Ease of Use: It has three different settings, so you can select the amount of batter that is released with each squeeze of the handle.  Instructions say to pull the handle firmly and quickly, which was a trick to get right.  I first tried it out on the brownies and definitely did NOT get the speed of handle pulling right. Each brownie came out dramatically different in size:

Photobucket

Photobucket

Photobucket

Photobucket

Photobucket

Next time I tried out the Batter Dispenser, I pulled the handle much more quickly... and what happened? Batter shot-gunned out of the gadget and splattered all over.  Guess I pulled a little too hard!:

Photobucket

But, with a little bit of practice, it gets easier to get more consistent in speed and firmness of pulling the trigger.  Look at my improvement!!:

Photobucket

Photobucket

For this category, we gave it: 3 out of 5 stars now, & maybe 4 with more practice.  So we'll give it 3.5.

3. Practicality:  I didn't have any problem with the spout dripping while I was using it.  Especially during cupcake making, you go quickly from one cupcake liner to the next, so there isn't much down time for the gadget.  However, during pancake making there is wait time between laying down the batter and the pancakes cooking and getting removed from the griddle to make room for more batter.  So I did have a problem with what to do with the gadget in between pancakes.  I tried laying it down upright - with the spout side down.. and batter leaked everything.  I tried laying it on its side, and I found batter all over my counter within a couple of seconds.  The only solution I found was to hold the batter dispenser in my hands upside down so the spout it face up.  Kind of a nuisance to have to hold it the entire time.  The fiance said the dispenser should have a holster or a stand of some sort so the cook doesn't have the hold it for the entire pancake prep time. 2 out of 5 stars.


4. Versatility: The batter dispenser can handle a variety of batters, as long as it is on the liquidy side.  Pancakes, waffles, cake batter, brownie batter, blondie batter - are all fair game.  What's really great is that it works with mix-ins, too.  Those chocolate chips, blueberries, and nuts that you want to put into your goodies will all fit through the spout with no problem.  I tried this out to make sure this was true, and the walnuts in my brownies came through the spout with ease.  4 out of 5 stars.


5. Capacity: The batter container can hold up to 2 cups of batter at a time.  To make 16 brownie cupcakes, I had to refill only once.  I made a small batch of 8 pancakes, and I had to refill the container once.  I had the fiance manning the griddle, so he could watch the pancakes while I reloaded.  So, for small baking projects it has a good capacity.  But for larger batches, it might become a nuisance to have to keep refilling with batter. 3 out of 5 stars.


6. Ease of Cleaning: All of the parts come apart very easily, and there are no annoying little spots for batter to get stuck.  It is very easy to rinse clean, and it is even dishwasher friendly.  5 out of 5 stars.


7. Price: The batter dispenser currently has a $30 price tag at CSN stores.  It isn't cheap, but it also isn't an outrageous price for a product that can help with a variety of different cooking projects. 3 out of 5 stars.


CONCLUSION:  With practice, I think it can really make cupcake making easier.  It'll help avoid the drips on the pan between cupcakes, and since you're going from cupcake liner to cupcake liner fairly quickly, you don't have to worry about where to put it in between uses.  However, I probably wouldn't take it out for pancakes, unless I had a bunch of people over and I needed to make a good amount of pancakes.  For the $30 price tag, I think I'd ask for it for a gift, but probably not by it for myself.  Overall, it gets a 3.35 out of 5 stars (the average of its scores in the above categories).  If you'd like to purchase this item, visit CSN stores by clicking here.

Has anyone else ever used this product?  I'd love to hear your thoughts on it!

Monday, July 14, 2008

Jello Sherbert and Super Cool New Gadget

Photobucket

So, its hot here in Florida. Hot. No matter how air conditioned the house is, the minute I turn on the oven and start doing anything in the kitchen, I break a pretty serious sweat. This normally doesn't really slow me down much, because really, doing anything this time of year in this part of the country makes you break a sweat. Recently, however, I was in the mood to make something and too damn hot to turn the oven on. I reached into my long list of things to make in the near future and pulled out a recipe for making sherbert from jello. Didn't use the oven, just the stove top. Not too bad for you. Cool, icy result. Perfect! I had the recipe saved on my computer in a neat little program I have that stores recipes with pictures, where I put links to where I found them. Dan, unfortunately, deleted it accidentally when I asked him for a measurement while I was making it. I found it online at its original site here at Neverbashfulwithbutter's old blogspot. I used it that night to get my measurement that Daniel deleted, and then the next day, it seemed it had been pulled off the site. So, unfortunately, I am not able to post the recipe. I know it was from the Joys of Jello 1981 book, and that it involved 4 ounces of cool whip, a 3 oz box of jello, either 1/2 c of sugar or 3/4 c and water, but I don't remember the exact measurements. :( If anyone knows it, I'd appreciate it! Anyway, here are the results:

Photobucket

Photobucket
Sadie really enjoyed it, too.

Photobucket
Really enjoyed it.

Photobucket
It was pretty good, but not as flavorful as it should have been. When I was making room in the freezer for the 8x8 pan, the pot of water/jello/sugar mixture boiled over and I lost a lot of my concoction. If anyone finds the recipe, and wants to make it, I recommend keeping an eye on your pot! It takes a while to boil, but when it does, it boils over quick!

On another note, I wanted to introduce you to my cool new kitchen gadget friend. In the move into our house, we had tons of boxes from new stuff we had bought. In the confusion of all of these boxes, my kitchenaid mixer box was thrown away... with my dough hook and paddle attachment in it!! Dan bought THIS. Its a paddle attachment for kitchenaid mixers with rubber spatulas on the side, so it scrapes the side of the bowl and pushes down the dough as it turns. Its great! I made a familiar recipe with it so I could see how good it really works.

Photobucket

And it really does work. The website says to reduce speed and length of mixing time, so we adjusted accordingly. Worked like a charm. The result? These gorgeous Key Lime Cupcakes with Palm Tree Sprinkles, oh so Florida.

Photobucket

Photobucket

Monday, April 14, 2008

New Baking Gadget

Though I did not bake this, it is baking related... and I want one!!
Is this not the greatest invention for lazy bakers?

LinkWithin

Related Posts with Thumbnails