Recent Posts

Sunday, August 21, 2011

The Cookiepedia and Crinkle Cookies

Recently I was asked to review a new cookbook, The Cookiepedia: Mixing, Baking and Reinventing the Classics by Stacy Adimando.  SURE I said, who doesn't want more cookie recipes?  Soon enough, the little book arrived in the mail, and honestly, it was so cute I couldn't wait to start making some of the recipes.  
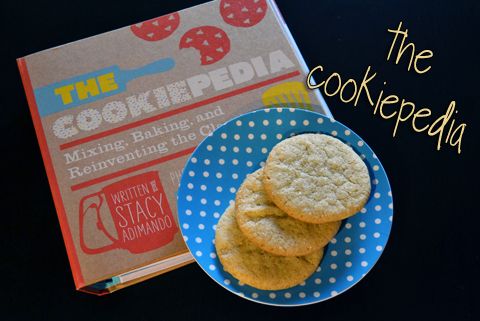
First, I noticed that the book is a spiral bound.  This one simple little thing immediately made me happy.  How many times have you been working from a typical cookbook only to have it slam closed when you're in the middle of a recipe with fingers covered in butter and eggs?  The spiral binding allowed it to lay flat on the counter and stay open throughout prep time.  
Second thing I noticed before I even started baking was how absolutely adorable the book was.  It is packed full of darling little illustrations that appear on almost every page.  And, I don't know about you, but I'm a visual person.  This book has an index of its recipe that made selecting a recipe so much easier.  There are 6 categories or chapters of cookies: Buttery, Chocolaty, Fancy, Fruity, Spicy, and Nutty & Seedy.  Each chapter has a two-page introduction that serves as an index: Each cookie in the following chapter has a portrait in this little pictorial table of contents.  They say you eat with your eyes first!  With a glance at this chapter intro, I was able to quickly pick out which cookie I wanted to make. 
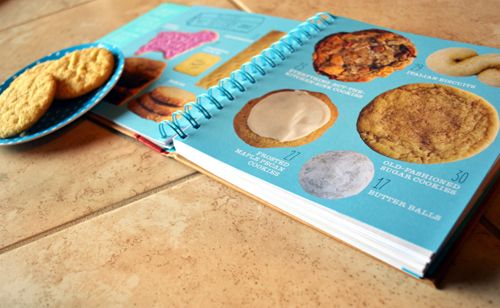
i love this picture index!

I've made two recipes from the book so far.  First up, I made the Crinkle Cookies.  I've always thought these cookies were so pretty but have never made one before because I've heard they're on the dry side.  The description in this book, though, said they have a "down-home fudgy flavor".  I was sold.  
The dough came together rather quickly.  Besides chilling time, these cookies were fast and simple.  The result?  Moist, chocolaty perfection.  They were almost truffle or brownie like.  Very unlike the dry crumbly crinkle cookies I've heard about.  I brought them to work where they were very well received (and all gone!)  The only adjustment I made to the recipe was to use a combination of bittersweet and semisweet chocolate instead of all bittersweet.  I can't wait to make them again and try the Espresso variation Adimando includes at the end of the recipe.  


The second recipe I made was Old-Fashioned Sugar Cookies.  Once again, the dough was simple to put together.  Really!  Daniel went to help a neighbor change a fire alarm battery, and by the time he came back a few minutes later, the dough was finished and chilling in the fridge.  The only variation I made on this recipe was to dunk the top of my cookies in turbinado sugar rather than sprinkling vanilla sugar on top (but I bet that would have been so delicious!).  These came out moist, flavorful, and chewy.  They very well might have made their way into my top 3 favorite sugar cookie recipes.  

Below is the recipe for Crinkle Cookies, posted with permission from Quirk Books (recipe shown with my small alterations).  For the other recipes, pick up a copy of The Cookiepedia by Stacy Adimando.  The Cookiepedia is set to come out in September.  The "re-invented-ness" of the recipe make them perfect for a seasoned baking pro, while the helpful guides, instructions, and glossaries make it great for beginners, too.  If you want to try out some new versions of classic cookie recipes, be sure to pick up a copy when it comes out.


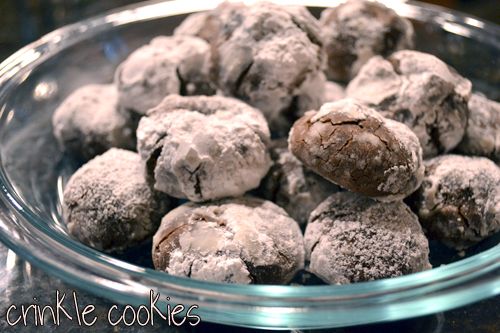
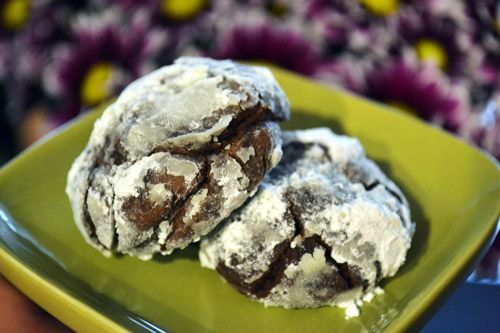
Crinkle Cookies, from The Cookiepedia by Stacy Adimando
Ingredients:
3 oz bittersweet chocolate, finely chopped
3 oz semisweet chocolate, finely chopped
1/4 cup + 2 Tblspn unsalted butter at room temp
1/2 cup sugar
2 eggs, room temp
1 tsp pure vanilla
1 1/2 cups all purpose flour
2 Tblspn cocoa powder
3/4 tsp baking powder
1/4 tsp salt
Powdered sugar for rolling


  1. Set a pot of water on the stove and bring to a simmer.  Place the chopped chocolate and butter into a glass or metal bowl and set the bowl over the simmering water.  Let the chocolate start to melt, then stir occasionally until it's smooth. Remove from heat and set aside.
  2. Beat the sugar and eggs on medium speed for several minutes until thick and smooth. Add vanilla and melted chocolate and continue beating on medium-low until combined.
  3. Sift the flour, cocoa powder, baking powder and salt in a separate bowl.  Add the mixture in two batches, beating each time until just combined. Cover the dough with plastic wrap and let chill for about 2 hours, or until firm enough to scoop.  Then, preheat to 325. 
  4. Line several cookie sheets with parchment. Roll 1 inch balls, then toss in powdered sugar, coating completely.  Place about 1 1/2 inches apart on the cookie sheet. Bake 8 - 10 minutes or until starting to feel firm to the touch.  Cool for 5 minutes before transferring the cookies to wire racks to cool completely.  

Monday, August 15, 2011

Sunday Night Cake

Every once in a while, I find myself in a comfort baking rut.  It's not that I haven't wanted to bake lately, but that I keep turning to tried and true favorites.  Does that ever happen to you?  When you find you aren't in the mood to experiment with new recipes, and would rather go with one you know will come out just the way you want.  


Luckily, that is one of the main reason I join online baking clubs.  Someone in the club chooses the recipe, and we all bake along.  It really gets me to go outside my comfort zone and try something new.  While I love the cookbook Baked Explorations: Classic American Desserts Reinvented, the "Sunday Night Cake" is probably not one I'd have picked on my own, especially not when I'm in an un-adventerous baking mood.  I already have a favorite plain vanilla cake recipe, so this is not one that would have stood out to me as a "need to bake asap!" recipe.  But, Julie of A Little Bit of Everything chose this recipe as our bake-along for August 15th... and I'm SO glad she did!  It was such a hit.  Whenever I make something "plain" I always worry that it'll just sit there at Sunday dinner and not get eaten.  But everyone loved this cake.  The cake itself was on the dense side, and the small 1/2 teaspoon of cinnamon really shined through.  The frosting was very unique - I love the idea of a chocolate pudding frosting!  


The one change I made to the recipe was to cut the 8 inch square cake in half and add a vanilla buttercream layer.  I thought the sweetness of the vanilla layer played very well with the richness of the chocolate pudding frosting.  All the flavors worked together very nicely.  This is a definite will-make-again!
Be sure to visit Julie at A Little Bit of Everything for the recipe (it is a keeper!!).  And then visit Club Baked to see how everyone else's Sunday Night Cake came out!

Monday, August 1, 2011

Chocolate Mint Thumbprint Cookies

Yesterday, I made two desserts.  The first is one of the most tropical, summery things I've ever made (Mango Sorbet... post to come soon).  And the second is Chocolate Mint Thumbprint Cookies, which, taste testers agreed, "taste like Christmas!"  The seasons are a little confused here in this house.  But both the Christmas cookies and the summery sorbet were very well received, no matter what season it really is.  


The Chocolate Thumbprint Cookies were chosen by Jamie of Random Acts of Food as this week's recipe for Club: BAKED.  I've only fairly recently discovered that the combination of Chocolate and Mint is not overwhelmingly gross.  Up until last summer, even the scent of mint in my desserts completely disgusted me.  Daniel's Chocolate Mint oreos had to be stored in a double layer of plastic storage bag and in a separate drawer to prevent the mint aroma from infecting and absorbing into my oreos.  As far as I was concerned, mint was only good in chewing gum.  But after growing my own fresh mint plant and including some of it in a Chocolate Mint cookie, I realized it's actually pretty darn delicious.  Chocolate and Mint seems like one of those flavor combinations you either LOVE or you HATE.  Which side are you on?


I prepared this recipe exactly as written in the Baked Explorations book.  I'm glad I did, because they came out terrific.  I'd love to try these with fresh mint leaves!  If you're making these, be prepared to have some seriously chocolatey hands!  The dough, even after chilled, was very messy.  But it was worth it!


Be sure to visit the Club:BAKED site to see how the other bakers fared with this recipe.  And visit Random Acts of Food for the recipe.  

LinkWithin

Related Posts with Thumbnails