Recent Posts

Wednesday, January 21, 2009

Individual Mini Coffee Cakes


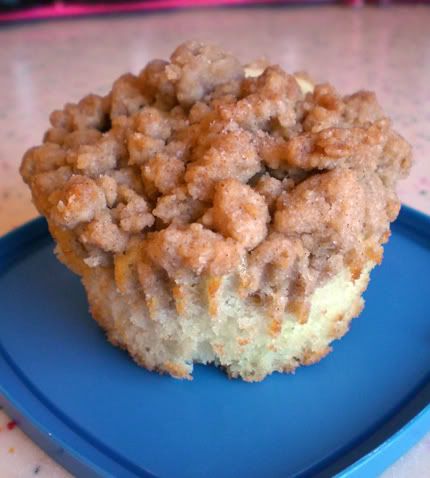
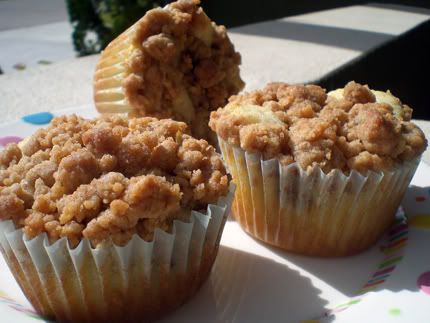
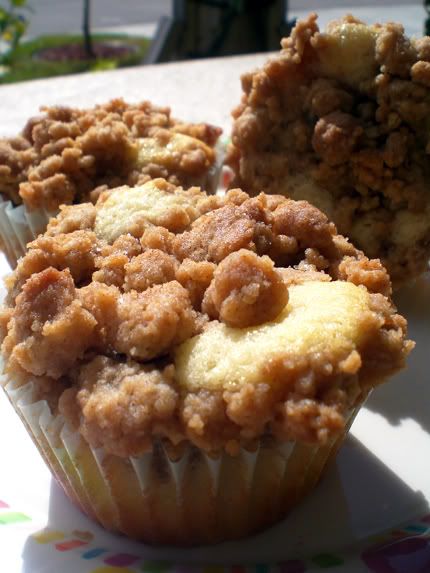
Coffee cake. Delicious, simple, a classic. I love coffee cake, Daniel loves coffee cake. I wonder why I hadn't made it in so long! I had some time on my hands to kill the other morning, so I decided to make some so Dan could bring them to work for breakfast. I'm so nice, right? I had a recipe that I made quite a bit a few years ago, but since I like trying new ones out, I searched Food Network and Epicurious for a Coffee Cake recipe with a high rating and tons of good reviews. Finally I came across this one and decided to go with it. I only made minor changes, included leaving out the jammy swirl (sometimes, you shouldn't mess with a classic) and baking it in a cupcake pan to make little individual Coffee Cupcakes instead of one big one. Perfect for grab-and-go with your coffee in the morning!

They came out wonderful. The crumby topping, Dan's favorite part, was perfect. And the cake was moist, and not too sweet - perfect for first thing in the A.M. A definite would-make-again. Below is the recipe with my alterations.


Individual Mini Coffee Cakes from Epicurious
Cake Ingredients
1 C flour
1/2 C Sugar
1 3/4 Tsp baking powder
3/4 stick salted butter, melted
Pinch of salt (if using unsalted butter, up this to 1/4 tsp)
1/2 C Milk
1 large egg, room temperature

Crumb Topping Ingredients
3/4 stick salted butter, melted
1/4 C packed dark brown sugar
1/4 C granulated sugar
3/4 tsp cinnamon
1 C + 1 tablespoon flour (+ extra if needed)
Cinnamon Sugar

Cake:
Preheat oven to 390. Put paper liners in 11 cupcake wells in a cupcake pan.
Whisk together flour, sugar, baking powder, and salt.
Whisk together butter, milk, and egg in a large bowl. When combined, whisk in flour mixture until just combined - batter will be lumpy. Pour batter into the liners of a cupcake pan until ~ 2/3 - 1/2 full.

Crumbies:
Whisk together butter, sugars, cinnamon, and salt until smooth.
Stir in flour with whisk, then stir through with a butter knife to create crumbies. Add more flour as needed to get a crumby texture. The crumbs will crisp up and dry out in the oven. Sprinkle crumbs over top of mini cakes, and LOAD 'EM UP - the crumbs are the best part! Sprinkle cinnamon sugar over the top of the crumbs and the top of the muffins/cakes.

Bake cake until a wooden pick inserted in center comes out clean, ~ 17 - 22 minutes. Cool in pan on a wire rack 5 minutes, then remove the cupcakes from the pan and let cool completely on the wire rack.

Monday, January 19, 2009

Finally... ICE CREAM Before Dinner!

I have claimed "Ice Cream Before Dinner" as both my blog name and my life philosophy for almost two years now, but not until a few weeks ago did it finally make sense! That's right, the latest edition to our kitchen... an Ice Cream Maker. This may be the most appropriate blog post I've made yet... so we certainly had to choose a really good recipe to begin this experimentation with.

After reading tons of excellent reviews for his book, David Lebovitz's The Perfect Scoop: Ice Creams, Sorbets, Granitas, and Sweet Accompaniments seemed a natural choice for my first Ice Cream Maker recipe book. But... I couldn't wait for my book to arrive before I used my new kitchen gadget! I used Books.Google.Com to virtually flip through the pages of this book (Google Books is great, it lets you preview portions of books before you buy them) and picked a recipe to get me through the week it would take for my precious book to be delivered.


We knew we wanted a relatively simple flavor like vanilla as our first to really be able to see the potential of this little machine. There were many variations on the simple vanilla, but the little snippet he wrote to go along with his "Malted Milk Ice Cream" recipe won me over. He tells of writing the book and the oodles of trial ice cream flavors his fridge became filled with in the process. Lebovitz says he was forced to begin giving them out to neighbors and friends, but the one flavor he always reserved for himself was this one, for Malted Milk Ice Cream. As I did not change the recipe at all, I will not post it here... but you can find it on Google Books or better yet, you can buy the book and try out the rest of the recipes! From the results of this one, I look forward to doing that. It was very creamy, very flavorful, and very rich (a little goes a long way).

This ice cream provided the perfect base for the add-ins of your choice.. we went topping crazy...

Monday, January 5, 2009

Pumpkin Chocolate Chip Cookies


Okay, so I know it's a little late in the season for Pumpkin, but I think it's tasty any time of year. I was hesitant to do a George Duran recipe just because I tend to stick with recipes from my favorite Food Network chefs when I'm getting a recipe from FN's website, but the high rating and loads of great reviews changed that... and I'm glad! These are delicious. They are a pumpkinny hybrid of chocolate chip cookies with the texture of a muffin top (quite an accurate comparison I got from Dan's sister). Lightly fall-spicey, complimented perfectly with the chocolate chips. Super soft, cakey, light, fluffy, and moist at the same time. I certainly agree with their 5 star rating. The only changes I made to the recipe was scaling it down... below is my version:


Pumpkin Chocolate Chip Cookies from Food Network & George Duran
Ingredients:
1 stick unsalted butter, softened
1/2 C granulated sugar
1/2 C light brown sugar
1 Large Egg
1/2 tsp vanilla
1/2 C canned pumpkin puree
1 1/2 C flour
1 tsp baking soda
1/4 tsp salt
1/2 tsp cinnamon
1/4 tsp ground ginger
1/8 tsp ground nutmeg
1/8 tsp ground cloves
3/4 C - 1 C (to taste) milk chocolate chips

Preheat to 350. Line cookie sheets with parchment paper.
Using an electric mixer, beat the butter. Add both sugars slowly, a little at a time, until mixture is light and fluffy. Beat in the egg. Then add the vanilla and pumpkin puree.
In a large bowl, combine flour, baking soda, salt, cinnamon, ginger, nutmeg, and cloves. Slowly add the flour mixture to the pumpkin batter in 3 parts. Stir in the chips.
Scoop the cookie dough by heaping tablespoons onto the prepared cookie sheets and bake for 15 to 20 minutes, or until the cookies are browned around the edges. Remove from the oven and let sit on cookie sheets for 2 minutes. Remove to wire racks to cool completely.

Sunday, January 4, 2009

Rainbow Cookies


These favorites were made back on Christmas Eve/Christmas. I've made them consistently for Christmas a few years running now. They are all over the place in New York Italian bakeries, but here in Florida, they're rather scarce. Even when you do find them here, they're just not the same. When done right, they are moist, almondy, dense, and super, super delicious. Even those who don't like almond, chocolate, or jelly in their desserts love these cookies. The reason I don't make them more often is that they are a heckkk of a lot of work. This year though, with my new food processor, and my new set of 3 rectangular 9x13 cake pans with square corners, they were a leeeettle bit easier... though they still took hours and hours over the course of 2 days. The end result, though, is always worth it.

Rainbow Cookies
Ingredients
:
8 ounces almond paste*
1 cup butter, softened
1 cup white granulated sugar
4 eggs separated
2 cups all purpose flour
red, green, and yellow food coloring
1/2 C seedless strawberry jelly**
1 C semisweet chocolate chips
Chocolate sprinkles

*Almond paste is common ingredient in Italian desserts, but if you are unlucky like me and your area either doesn't carry it at all, or only carries 7 ounce tubes, rather than waste another whole container just to get that one extra ounce...this can substitute for that missing ounce: slightly less than 3 tablespoons (a little less than a quarter cup) of blanched slivered almonds ground to a paste with 2 teaspoons sugar.

**Not the traditional flavor, but it’s what I like to use...also usually the kind I have on hand is of the chunky variety so I just run it through the food processor first.


Directions:
Grease (3) 9x13x2 pans (preferably not the glass kind, like pyrex, that are rounded at the corners. Square cornered pans are better.) then line with pans with parchment paper. Grease the parchment paper.

In a large bowl, break up the almond paste with a fork. (WHEW, I have learned from experience that this is ARDUOUS and takes a LONG time. Now, I put the grater blade into my food processor and break it up real quick.) In an electric mixer, cream together the almond paste, the butter, sugar, and egg yolks. When fluffy and smooth, stir in the flour.

In a small bowl, beat egg whites until soft peaks form and then fold them in to the dough.

Divide the dough into 3 equal parts. Tint each a different color: red, green and yellow. Spread into the prepared pans so that it evenly coats the entire pan (this takes a while).


Bake 10 – 12 minutes until lightly browned around the edges. Remove paper with cookies from pan and allow to cool.


Place green layer on a big sheet of plastic wrap large enough to cover all the layers when they are stacked. Fit it into a 9 x 13 cookie sheet. Spread jelly to taste – you do not want too much, or your layers will slide apart from each other. Generally, 1/2 c should be enough for the entire recipe. Top jelly coated green layer with the yellow layer. Spread jelly.


Top with red layer.


See all the layers so nicely stacked?


Cover all the layers with the oversized piece of plastic wrap and seal around the edges.


Put a cutting board, or a baking sheet on top of it with some weights on top to flatten it down over night in the frig. (I just put whatever happens to be in my frig at the moment on top of the cookie sheet or cake pan that I put on top of my cookies... water bottles, a half gallon of milk, a jar of pickles, anything. Spread the weight out so it is distributed evenly.)

Remove sheet from frig and remove plastic. Top a double boiler with the chocolate chips. When completely smooth, spread on to the top of the red layer, spreading all the way to the edges.


Before it sets, generously cover with chocolate sprinkles and lightly press down with your fingers through plastic wrap.


Refrigerate until chocolate it firm and then cut. ENJOY!!

LinkWithin

Related Posts with Thumbnails