Recent Posts

Wednesday, December 18, 2013

Whole Wheat Gingerbread Cupcakes with Cinnamon Brown Sugar Buttercream Frosting

With the holidays right around the corner, this is a great recipe to have in your back pocket.  Recently, I went to a little get-together and needed a quick and easy holiday treat.  I had a box of Whole Wheat Gingerbread mix from Hodgson Mill sitting in the pantry.  I'm generally kind of wary about any sort of baking mix, due to the chemicals and other weird things in the ingredients list.  Much to my surprise, when I looked at the ingredients list on the box of this Gingerbread mix, I saw only ingredients that I could easily pronounce… Whole grain whole wheat flour, molasses, brown sugar, baking soda, ginger, cinnamon, salt and cloves.  Knowing everything in this mix was a normal baking ingredient I typically stock in my own pantry, I found this recipe for Whole Wheat Gingerbread Cupcakes on Hodgson Mill's website and set to work with no hesitation.   These have a wonderful texture, not something you'd expect from a whole wheat recipe.  And the little bit of cocoa added to the batter, along with the cinnamon brown sugar buttercream really make these something special. 


Whole Wheat Gingerbread Cupcakes with Cinnamon Brown Sugar Buttercream Frosting
For the cupcakes (makes 15 cupcakes)
Ingredients:
1 15oz box Hodgson Mill Whole Wheat Gingerbread Mix
2 tsp cocoa powder
1 tsp baking powder
1 tsp ground cinnamon
1/4 cup light brown sugar
1/2 cup butter, melted and cooled slightly
3 large eggs, room temperature
3/4 cup water, room temperature

In a medium bowl, whisk together the gingerbread mix, baking powder, cocoa powder and brown sugar, and set aside.  
In a large bowl, whisk together the melted butter and eggs.  
Using a large spoon, stir  the dry ingredients into the wet in three additions alternating with the water, beginning and ending with the dry mixture and stirring until it’s incorporated and the batter is smooth.  
Fill a paper lined muffin tin ½ to 2/3 full with batter.  
Bake cupcakes in a 350˚F oven for 20-25 minutes or until a toothpick comes out clean.  Immediately remove the cupcakes from the pan and cool on a wire rack.  

For the frosting
Ingredients:
3/4 cup unsalted butter, room temperature (1 1/2 sticks) 
1/3 cup light brown sugar
pinch of fine sea salt
1/8 tsp vanilla extract
1/2 tsp ground cinnamon
3 cups powdered sugar
1/8 - 1/4 cup milk

In a large mixing bowl, beat the butter until light and fluffy.  Add brown sugar, salt, vanilla and cinnamon beating until well incorporated.  Add the powdered sugar one cup at a time beating well after each addition.  One tablespoon at a time, add the milk and beat on high speed.  Add milk until the desired consistency is reached.  Pipe onto cooled cupcakes.

Saturday, December 7, 2013

Hodgson Mill GIVEAWAY!


Those Whole Wheat Pumpkin Crumb muffins with from my last post were the perfect fall or winter breakfast (or snack… at any time of the day).  That was one of those recipes when I was really sad when they were gone.  I think I'll be making them again soon.  I have so many other plans for the Hodgson Mill flours sitting in my pantry, too!

Want to try baking with Hodgson Mill's flours for yourself?  The nice people are Hodgson Mill are nice enough to offer a Prize-Pack giveaway for one lucky Ice Cream Before Dinner reader!  One lucky winner will receive a $25 value of assorted Hodgson Mill products, your choice of choice of gluten free or whole wheat products.

Also, don't forget!  Hodgson Will is also doing a  “25 Days of GRAIN Holiday” Sweepstakes - One winner will be selected to win every day for 25 days – winner's choice of $25 worth of gluten free products or an assortment of whole wheat baking mixes and flours!  Plus, they're offering a $1 off coupon, good for any 5LB bag flour or cornmeal (http://bit.ly/GrainSavings)

a Rafflecopter giveaway

Thursday, December 5, 2013

Have a GRAIN Holiday: Pumpkin Crumb Muffins with Cinnamon Cream Cheese Filling and Salted Caramel Sauce

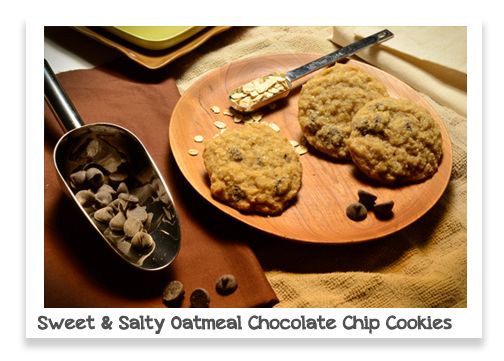
How many times have your grand baking plans ended in disaster?  For me, it has been quite a few.  This Thanksgiving was no exception, except thankfully this time I was able to turn it around into a total baking win - and I found a new favorite muffin recipe in the process. 

I had very high hopes for Thanksgiving dessert.  I was going to make crepes for the first time.  We prepared all of the fixings (the filling, the sauce) ahead of time besides the crepe batter - we left that to the last minute so that the crepes would be fresh when it was time to eat… It turns out crepes are not as easy to make as all those Parisian crepe makers make it look.  After many attempts, we finally got some that weren't so bad-looking, but they were hardly the perfect looking pastry I had envisioned.  While it tasted pretty good, it just didn't live up to my expectations.  I think I'll leave the crepe making up to the experts.

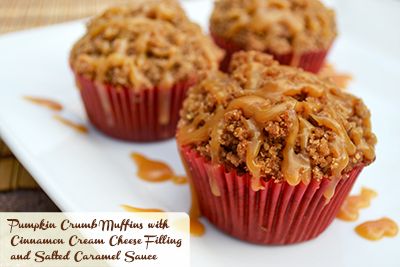
The morning after, I found myself awake early... with a muffin craving... and lots of extra ingredients left over from the failed crepe making experiment.  Armed with a variety of premium flours from Hodgson Mill, I set to work.    The end result was an absolutely perfect Morning-After-a-Holiday muffin (or any other day muffin, for that matter).  These moist, Whole wheat Pumpkin Muffins have a brown sugar crumb on top, and a Cinnamon Cream Cheese filling.  The Salted Caramel drizzle is an absolute MUST and takes these muffins to the next level of awesome.  I enjoyed these so much, I think I'll be making them on the day after Christmas, too.  You would never guess there are whole wheat!  I really think the high quality flour used made a big difference here.  The awesome people of Hodgson Mill are giving out $1 off coupons good on any 5 lb bag of Hodgson Mill flour or cornmeal, click here.  Plus, they are doing a 25 Days of GRAIN holiday sweepstakes.  One winner will be selected to win every day for 25 days – winner's choice of $25 worth of gluten free products or an assortment of whole wheat baking mixes and flours.


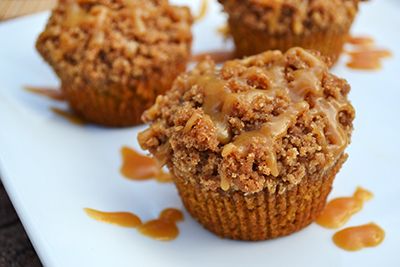
Pumpkin Crumb Muffins with Cinnamon Cream Cheese Filling and Salted Caramel Sauce,
makes 12 muffins

Ingredients for the muffin: 
1 1/2 cups White Whole Wheat Hodgson Mill flour
2 tsp cinnamon
1/4 tsp nutmeg
1/2 tsp baking soda
1/2 tsp fine sea salt
2 large eggs, room temperature
1 cup granulated sugar
14 oz pure pumpkin (aka pureed pumpkin, canned pumpkin)
2/3 cup canola oil
1/2 tsp pure vanilla extract

Ingredients for the Crumb topping: 
1/2 cup White Whole Wheat Hodgson Mill flour
1/3 cup light brown sugar
1/2 tsp cinnamon
3 tablespoons unsalted butter, melted and cooled

Ingredients for the Cinnamon Cream Cheese Filling:
4 ounces cream cheese, softened
1 1/2 tsp cinnamon
1/4 tsp pure vanilla extract
1 1/2 Tablespoons sugar


Directions:
Preheat the oven to 350 F.  Line a muffin tin with 12 liners and set aside.

Prepare the filling: Using a hand mixer, combine the softened cream cheese and the cinnamon and sugar.  When they are fully incorporated, add in the vanilla.  Mix to combine.  Transfer the mixture to a piping bag and refrigerate.

Prepare the crumb topping: In a medium bowl, combine the flour, brown sugar, cinnamon, and melted butter with a fork or whisk.  It should form small crumbs.  

Prepare the muffin batter: In a large bowl, whisk to combine the flour, cinnamon, nutmeg, baking soda and salt. In a separate bowl, whisk together the sugar, pumpkin, eggs, oil, and vanilla.  Add the wet ingredients to the dry ingredients.  Fold in the wet ingredients until combined.

Fill the wells of the cupcake tin with the batter, about 2/3 full.  Pipe a dollop of cinnamon cream cheese filling onto the top of the batter.  Then, sprinkle each muffin with crumb topping.

Bake for about 18 - 22 minutes, or until a toothpick inserted into the batter (not the cream cheese) does out clean with only small crumbs.  Allow to cool for 5 minutes in the pan before removing to a cooling rack.


Salted Caramel Sauce
Ingredients:
1/2 cup salted butter
1/2 cup heavy cream
1 cup granulated sugar
1 1/4 cup milk
1/2 teaspoon fine sea salt + additional for topping

Directions:
In a saucepan over medium-low heat, melt the butter together with the heavy cream.  Remove from the heat and set aside.  

Spread sugar into a thin, even layer at the bottom of a large pot.  Turn the heat to medium-low and allow the sugar heat up for 8 minutes, no stirring.  Let the sugar continue to heat up for the next 8 minutes.  Towards the end of this time, it should begin to liquify.  

When it begins to appear light brown and clear in spots, begin to fold the melted sugar on top of the unmelted sugar with a spatula.  Continue to fold until the entire thing has melted and it turns golden brown - This happens very quickly, so keep a close eye on it.  

When it turns golden brown, remove it from the heat and quickly stir in half of the cream-butter mixture - Stirring continuously the entire time.  Be careful to avoid bubbles and splashes from burning you.  Don't be scared if it begins to harden and clump.  If this happens, return the pot to medium-low heat and stir constantly until it has all melted.  Be patient!  If you want a thicker caramel, keep on the heat, stirring constantly for another 10 minutes.  Keep in mind, it will thicken as it cools.  As the last step, add in the sea salt and stir to incorporate.

Drizzle on top of the pumpkin muffins immediately before serving.  The caramel sauce can be stored in the refrigerator, and heated in the microwave prior to drizzling.  Serving suggestion: Sprinkle a small amount of sea salt on top of caramel drizzle before serving.

Sunday, November 17, 2013

Third Annual “Have a GRAIN Holiday” recipe contest from Hodgson Mill

For three years running, Hodgson Mill has hosted a "Have a Grain Holiday" recipe contest.  50 bloggers create delicious seasonal baked goods using their high quality flours.  My entry into this contest two years ago was Gingerbread Cake Bites with Lemon Frosting.  The result was adorable, bite-sized, pretty delicious, and perfect for holiday parties.  Plus, knowing that their flours, "have nutritious whole grains still ground between millstones, just as they did, oh, 6000 years ago," I felt pretty good about serving it, too.  

I love the flavors of holiday baking, so I'm already starting to brainstorm ideas for this year's contest… more to come in the next few weeks!  

To celebrate this contest, Hodgson Mill has a coupon good for $1 off any 5LB bag of Hodgson Mill flour or cornmeal - get yours here: http://bit.ly/GrainSavings. It gets better… they're also going to host a special sweepstakes launching on 12/1 – with a chance to win a prize every day for 25 days!  I'll share this link with you in the next few weeks, too.  

Furthermore, one lucky reader of IceCreamBeforeDinner.com will receive a great selection of assorted Hodgson Mill – a $25 value - winner's choice of gluten free products or a selection of Whole Wheat items (US residents only).

Woo, holiday baking!  Have you starting testing out new holiday recipes yet?

Tuesday, August 6, 2013

Classic Lemon Bars

Summer is winding down here in Central Florida.  Even though it is only early August and we still have quite a few months of hot summer weather left, school is about to start back up so it seems that time spent sitting by the poolside is pretty much at an end.  ...But one more tart, citrusy summer recipe couldn't hurt, though, right?  We made these Classic Lemon Bars recently and they have a wonderfully tart, tangy taste that just screams of summer.  These were delicious as is, but were even more amazing when served with freshly prepared whipped cream.  For my favorite vanilla whipped cream recipe, scroll down to the end of this post. 


Classic Lemon Bars, adapted from Food Network
Ingredients for the crust:
Oil for greasing the pan
1 1/2 stucks unsalted butter, diced
2 cups all purpose flour
1/4 cup packed light brown sugar
1/2 cup confectioner's sugar, plus more for garnishing
1/4 teaspoon fine sea salt

Ingredients for the filling:
4 large eggs plus 2 egg yolks, room temperature
2 cups granulated sugar
1/2 cup all purpose flour, sifted
1 teaspoon grated lemon zest
1 cup fresh lemon juice (from about 6 - 8 lemons)

To make the crust:
Preheat the oven to 350 F.  Grease a 9 x 13 pan with oil and line with parchment, leaving an overhang on the 2 long sides.  Lightly grease the parchment with oil.  
In a food processor, pulse butter, flour, both sugars and salt until the dough comes together, about 1 minute.  Press evenly into the pan and up the sides about 1/2 inch making sure there are no cracks.  Bake until lightly golden, about 20 - 25 minutes.

To make the filling:
While the crust is baking, prepare the filling. Whisk eggs, yolks, sugar, and flour in a bowl until smooth.  Whisk in lemon zest and guide.  Remove the crust from the oven and reduce oven temperature to 300 F.  Pour filling over the warm crust and put back in the oven.  Bake until just set, about 30 - 35 minutes.  

Allow the bars to cool in the pan on a rack, then refrigerate until firm for at least 2 hours.  Using a knife or spatula, trace around the outside of the bars to release them from the sides of the pan.  Lift the bars out of the pan with parchment and slice.  If desired, dust with confectioner's sugar prior to serving.  

Vanilla Whipped Cream:
Ingredients:
1 cup cold heavy whipping cream
2 tsp mexican vanilla
1/8 C granulated sugar + additional, if desired

Beat all ingredients together, on high, until mixture reaches light and fluffy consistency. Add more sugar if desired to reach desired sweetness.

Saturday, June 22, 2013

Easy Fourth of July Cupcake Tower

Sometimes (ok, the majority of the time) you want to make a big statement with your dessert display, without spending hours and hours in the kitchen.  When you're having a party, you just don't have the time to painstakingly make teeny tiny fondant shapes to go on 60 cupcakes.  You've got other things to do like clean the house, put up decorations, make the food, set up chairs, etc.  This Easy Fourth of July cupcake tower looks impressive without taking a long time or putting in lots of careful effort to make it look that way.  


Things you will need: 
(I left out amounts of everything so you can adapt to your own party's size)

  • Your favorite cupcake batter
  • Your favorite frosting 
  • Red & white striped liners
  • Card stock that can go in the printer
  • Blue star pattern circle printables
  • Red, White, and Blue striped ribbon
  • Glue dots (or other method for attaching ribbon to the cupcake tower) 
  • fresh blackberries, blueberries and red raspberries, rinsed and dried (for about 65 - 70 cupcakes, I used 1 quart of each type of berry)
  • small fourth of july themed pinwheels

  1. First, we baked up simple vanilla cupcakes in red and white striped liners that we picked up at the craft store.  We made about 64 cupcakes.  
  2. While those were baking, we printed out blue star pattern circles on card stock and punched them out into cute little doily shapes with a paper punch (similar to this one) though you could easily just cut them into squares or circles with regular scissors.  If you want to decorate your tower like we did, you'll need half as many doilies as you have cupcakes.  We alternated: 1 cupcake with a blue star doily, 1 cupcake with a pinwheel, etc. 
  3. Use glue dots to attach the red, white and blue striped ribbon to the edge of each tier of the tower.  
    • Steps 1 - 3 can all be done in advance! Doing these 1 - 2 days before your event is fine!
  4. Frost the cooled cupcakes
  5. Decorate the cupcakes with the berries.  I used 3 blueberries, 1 blackberry, 1 red raspberry on each cupcake.  Gently press into the frosting.
  6. Place all cupcakes on your The Smart Baker Cupcake Tower.  
  7. Alternate decoration types on the cupcakes: 1 cupcake gets a pinwheel, the next one gets a blue star doily, next one gets a pinwheel, the following gets a doily, etc.
Voila! You're done! That's it!  This was quick and easy to do.  If you use a box cake mix, or buy plain, frosted cupcakes from the grocery this would be even quicker.  Everyone will think you spent hours making your impressive Fourth of July dessert display!


Friday, June 21, 2013

Cracker Jack Snacks and a GIVEAWAY

Baseball was a big part of my family growing up.  Of course, we'd often go to Shea Stadium and watch the Mets play (though if I remember correctly, I was pretty much only interested in the soft serve ice cream served in a little plastic Met helmet).  However, Little League was a much bigger part of our lives than major league games.  I was the only child who never played (I've never really been much of a competitive athlete... unless bake-off's count) but my older sister played when she was little and my younger brother played from the time he was very young until he aged out.  My father was even (and still is!) the president of the local little league.  

My brother is much younger than my sister, Jenn, and I (10 years younger than me, and 12 years younger than Jenn) so by the time my brother was playing, we were old enough to help out during his games.  While dad was doing his presidential duties, my sister and I would often help out in the snack shack.  My favorite part of helping out was when our shifts were over, and my sister and I would grab a bag of Cracker Jack snacks and a soda, and we'd share it as we sat on the bleachers and watched the rest of Christopher's game.  When I think of Cracker Jack snacks, I remember those summer nights talking and laughing on the bleachers with my sister, cheering on my little brother as he pitched his heart out.  

The Cracker Jack brand has been around for 120 years (isn't that amazing?!).  In celebration of this big anniversary, they're putting out new flavors, improving on the original variety, and modernizing their prizes.  I was lucky enough to sample the new flavors, Butter Toffee and Kettle Corn.  Both of which were delicious... I can't tell which one I enjoyed more.  The Butter Toffee variety could satisfy any sweet tooth, while the Kettle Corn had a more subtle sweetness, and kept me coming back for another handful, time after time.  


Giveaway:  Cracker Jack snacks has offered to giveaway 6 bags of the 3 assorted flavors to one lucky reader of Ice Cream Before Dinner!
a Rafflecopter giveaway


*Details and rules:
  • Open to residents of the U.S. only
  • Giveaway will end Friday, June 28, 2013 at 12:00 AM EST.
  • Giveaway will be conducted via rafflecopter (www.rafflecopter.com)
  • Winner will be announced by Tuesday, July 2nd, 11:59 PM EST.
  • Winner will be notified by email and will have until Friday, July 5th to claim their prize and provide their mailing address, after which, if the winner does not respond with their mailing address, another winner will be selected.
  • Winner will receive 
  • 6 bags of the 3 assorted flavors of Cracker Jack snacks provided directly from Cracker Jack brand.
  • Disclosure:
  •   The Cracker Jack snack products were provided to me by Cracker Jack brand for my participation in this blogging/trial program.  Any and all opinions posted on this blog are based on my own experiences with the Cracker Jack brand products.  Cracker Jack brand provided the product for the giveaway for my review on this blog and for the giveaway.  I was not compensated for my participation.

Wednesday, June 19, 2013

Key Lime White Chocolate Chip Cookies

Recently, we took a weekend trip to the Sarasota area.  It's only about 2 1/2 hours away, yet we had never made the relatively short journey over.  I'm glad we finally decided to spend some time there because we loved it there.  In just a few days, we visited Sarasota, St. Petersburg, Tampa, Siesta Key, and Longboat Key.  Some of our favorite things from our trip involve food (obviously).  First, we thoroughly enjoyed visiting The Lollicake Queen and Perq, and meeting the wonderful, kind, creative minds behind the two establishments (more on that to follow in a later blog post).  We're a bit jealous of people who live in Sarasota and get to have their lollicake cake pops whenever they want!  
As you can see, we enjoyed our fair share of lollicakes :)

We also enjoyed wonderful dinners at Indigenous, Owen's Fish Camp, and breakfast at Station 400, all of which we'd love to go back to again! 
Second, we loved shopping at the Sarasota farmer's market.  WOW!  I wish we had something like this in our immediate area, I'd visit all the time!  It was bustling with friendly vendors, tons of customers, and lots and lots of goodies.  One thing we just couldn't resist was a pound of fresh key limes.  With them, we whipped up this batch of soft Key Lime White Chocolate Chip cookies.  These didn't last very long... always a good sign :)

PS - Do you follow us on Instagram yet?  Whenever we go on Foodventures like these, we always post pictures along the way!  


Soft Key Lime White Chocolate Chip Cookies, adapted from Cookie Madness
Ingredients:
1 stick unsalted butter, room temperature
1 cup granulated sugar
1 large egg + 1 large yolk, room temperature
1 1/2 cup all purpose flour
1 teaspoon baking powder
1/2 teaspoon fine sea salt
1/4 cup freshly squeezed key lime juice
1 1/2 teaspoons key lime zest
3/4 cup white chocolate chips

Preheat oven to 350 F.  Line cookie sheets with parchment paper, and set aside.
In the bowl of an electric mixer, beat the butter and sugar together until creamy.  Then, add the egg and yolk.  Beat.
In a small bowl, whisk together the flour, baking powder and sea salt to combine.  Turn the mixer to low and add the flour mixture.  
Next, add the lime juice and zest.  Add the chocolate chips and mix until just combined (do not over mix).  
Roll dough until 1 to 1 1/2 inch balls and arrange on parchment lined baking sheets approximately 2 1/2 inches apart.  Bake for around 10 - 12 minutes or until edges just barely begin to brown.  


Friday, June 7, 2013

Cowgirl Birthday Cupcake Tower

Here at The Smart Baker, we've made all different types of decorated cupcakes for parties.  Lately, rather than make a lot of time-consuming edible decorations I've been using Cupcake Picks as simple but chic cupcake toppers.  It is so easy to make the cupcakes match the theme of the party.  
This April was our niece Ella's 4th birthday, which she celebrated by having a party at the farm with a petting zoo and pony rides.  To go with the theme, we made her this Cowgirl Cupcake Tower.  There were chocolate and vanilla cupcakes in pink, blue and green gingham print liners, with contrasting color gingham cupcake picks with her name on them.


Monday, June 3, 2013

Highly Addictive Salted Caramel Pretzel Bark

I often make cakes, pies and tarts which require slicing before serving.  If someone wants a piece they need to very deliberately pick up a knife, grab a plate, slice and serve.  However, I really enjoy making things people can  casually snack on, too.  These things don't require knives for slicing, spoons for scooping, or even plates for serving.  These things can just be picked up and popped in one's mouth.  I think these types of things are usually the biggest hit (or at least the type with the least left over).  

This is one of my top favorite "snacking" recipes.  It is pretty easy to prepare, and results in a bite-sized, sweet-n-salty, highly addictive snack.  I found this this recipe on Mama Say What!?  and I'm very glad I did, because this was thoroughly enjoyed by all who snacked on it.  My favorite way to enjoy it is straight out of the freezer!
Salted Caramel Pretzel Bark
Ingredients:
1/2 of a 1 lb bag of mini pretzels
2 sticks unsalted butter, room temperature
1 cup lightly packed light brown sugar
2 cups chocolate chips of your choice (I used semisweet)
Fine sea salt (I always use Diamond Crystal)

Preheat your oven to 350 F.

Line a large jelly roll pan (or two 9x13 pans) with precut parchment paper.  Carefully, line the trays with the mini pretzels making neat rows, placing the pretzels right up against each other.  

In a medium saucepan on medium heat, melt the butter.  Add the brown sugar and stir.  Allow the sugar to dissolve and let it bowl gently just until it starts to stick to the bottom and it forms a nice smooth caramel.  Let it bubble and little and get nice and thick.

Remove from heat, and pour evenly over the rows of pretzels.  Put in the preheated over for 5 minutes (this will help the caramel spread out even more evenly).  Remove from the oven and sprinkle the chocolate chips over the top.  Place back in the oven for just 1 minute, and then spread the chocolate chips around with a offset spatula until mostly melted.  

Sprinkle generously with sea salt, and allow to cool at room temperature for a few minutes.  Then place in the freezer for 2 to 3 hours, until completely frozen.  When frozen, break it up into pieces and serve.  (I like to keep it in the freezer until I serve it).  

Wednesday, May 29, 2013

Toilet Humor... Crap, You're Old cake

Most of the time, I make Princess cakes, or Lightning McQueen cakes, or cupcake towers themed with cute little jungle animals or smiling ladybugs.  Recently, however, I made a cake quite different from the adorable desserts we're used to making.  We were requested to make a toilet shaped "Crap, You're Old" cake for our brother in law's 40th birthday... complete with a baby ruth sitting in the bowl.  Take a look for yourself... if you have a strong stomach.  Weak stomached readers, you may want to press the back button on your browser and skip this post. :)


To create this unique shape, we used many different sizes and shapes for the baking pans.
For the tank: We made two 8 inch square cakes, cut them in half and stack them on top of each other (making a four layer 8x4 inch cake)
For the bowl: We did a two layer 8 inch round cake and carved down the sides to get the curvature at the bottom where it meets the base.  
For the base under the bowl: We used one 6 inch round cake
All of the cakes were frosted and covered in white fondant.  

To make the blue "water" for the inside of the bowl, we simply tinted clear piping gel with food coloring and piped it into the bowl.  To make the... err.... "present" in the bowl, we microwaved a Baby Ruth candy bar for a few seconds and shaped it a little bit.  

The cake was a pretty big hit at the party.  We asked the question "Funny or just gross?" on The Smart Baker's Facebook page and there were some pretty strong feelings about this one.  There were just as many people that thought it was hysterical as those who felt it was just too gross to eat.  What do you think?  Would you make this cake?  And would you actually eat it if it was served at a party? 


Sunday, February 24, 2013

Sweet and Salty Oatmeal Chocolate Chip Cookies

Are you into the Sweet and Salty trend?  We so completely are.  Every recipe I make includes fine sea salt in one way or another.  This new recipe, however, take it to a whole other level.  This is like a cross between a potato chip and a chocolate chip cookies... in a good way.  It has the sweet and chewiness of a oatmeal chocolate chip cookie combined with the salty addictiveness of a potato chip - I definitely "could not stop at just one".

*The basic oatmeal chocolate chip cookie dough recipe is formed into balls which is then rolled in a combination of Sugar in the Raw and fine Sea Salt.  The original recipe called for 1 1/2 Tablespoon of salt, but I found that to be just too much.  So, in the recipe below I reduced it to 1/2 Tablespoon.  If you find it to too salty / not salty enough, simply adjust the recipe to fit your tastes.


Sweet and Salty Oatmeal Chocolate Chip Cookies adapted from My Kitchen Addiction
Ingredients:
1 cup (2 sticks) unsalted butter, softened
1/2 cup granulated sugar
1/2 cup light brown sugar, lightly packed
1 egg, room temperature
1/4 cup light corn syrup
1 teaspoon vanilla extract
3 cups old fashioned rolled oats
1 1/2 cups all purpose flour
1 teaspoon baking soda
1/2 teaspoon fine sea salt
1 cup chocolate chips
1/2 cup raw sugar (such as Sugar in the Raw)
1/2 Tablespoon fine sea salt* (see note about salt amount above)

In the bowl of an electric mixer, cream together the butter, granulated sugar, and brown sugar in a large mixing bowl.  Add in egg and beat until smooth.  Add the corn syrup and vanilla, and beat until fully incorporated.

In a separate bowl, whisk to combine oats, flour, baking soda and 1/2 tsp salt.  Gradually add the dry ingredients to the creamed mixture, mixing on low until the batter comes together.  Stir in the chocolate chips.  Refrigerate at least 30 minutes.

Towards the end of chilling, preheat the oven to 375 and line several cookie sheets with pre-cut parchment.  In a small dish, combine raw sugar and fine sea salt.  Roll cookie dough balls to about 1 inch, and roll each in the sugar-salt mixture.  Using your palm or a flat spatula, press down gently to slightly flatten.  Bake 8 - 10 minutes or until edges are just barely golden - do not over bake!  Cool on pan about 5 minutes and then transfer to wire rack to cool completely.

Thursday, January 31, 2013

Berry Key Lime Cheesecake with Greek Yogurt

Sometimes, you just need a cheesecake.  Wouldn't you agree?  It's great when said cheesecake is made with Greek Yogurt, so even when you're indulging you can feel just a little bit better about it.

I'm kind of picky about my cheesecake.  I'd rather not eat it if it's not amazing.  Mediocre cheesecake isn't really worth it for me.  Next time I'm feeling cheesecake, I think I'll go the Greek Yogurt route again because it lent the cake such a wonderful texture.  It was nice and light, unlike some heavy dense cheesecakes I've eaten.  The flavor from the flavored greek yogurts (raspberry and key lime) was noticeable but not over the top strong.  Overall this was a great (and SUPER SUPER easy!!) dessert.  We had no problem getting rid of the left overs.


Berry Key Lime Cheesecake, from Oikos
Ingredients:
Crust -
9 Graham Crackers
2 Tbsp Granulated Sugar
4 Tbspn butter, melted
Filling -
2 (5.3 oz) single serve containers of Dannon Oikos Key Lime Greek Yogurt
2 (5.3 oz) single serve containers of Dannon Oikos Raspberry Greek Yogurt
4 eggs, rom temperature
1 can sweetened condensed milk
4 Tbsp All Purpose Flour

In the bowl of a food processor, pulse graham crackers, sugar and butter.  Pat the mixture into the bottom of a 9 inch spring form pan. Set aside.
In a bowl, combine key lime yogurts with 2 eggs, 2 Tbspn flour and half of the sweetened condensed milk.  If desired, add food coloring.
In a separate bowl combine raspberry greek yogurts with 2 eggs, 2 Tbspn flour and half of the sweetened condensed milk.  If desired, add food coloring.
Pour Berry mixture on top of the crust.  Then slowly pour the key lime mixture on top of that.  Swirl with a knife if desired.
Bake a 250 F for 30 - 40 minutes, until the center of set and edges are fully cooked.  Refrigerate for at least 3 hours or over-night before serving.


Sunday, January 6, 2013

Apple Cinnamon Blondies

Hard to believe all the Holiday hub-bub is over.  Yesterday, we took down our Christmas tree and put away the last of the decorations.  I always feel a tiny bit sad when we do that, though it is nice to get that corner of the living room back.  Is everyone still in sugar shock from Holiday parties and dinners?  That's just not possible for us over here.  So if you're like me and you're not in a giving-up-sugar stage, then you may want to make these Apple Cinnamon Blondies.  It has all the comforting homeyness of apple pie, but is much much easier.  The end result is a moist, sweet, flavorful blondie that is just begging to be enjoyed with a scoop of ice cream on top :)  We put Sea Salt Caramel Gelato on top and that may just be one of the best decisions we made all week. 
Apple Cinnamon Blondies adapted from Baked by Rachel
Ingredients:
1 1/2 cups lightly packed light brown sugar
1 stick unsalted butter
1 1/4 cups all-purpose flour
1 teaspoon fine sea salt
1/2 teaspoon cinnamon
1/2 teaspoon baking powder
2 large eggs, room temperature
1 teaspoon vanilla extract
1 1/2 cups chopped granny smith apple, skin on (approx. 1 medium apple)
1/2 cup cinnamon mini baking chips (I used King Arthur Flour)
Directions:
Pre-heat oven to 350; spray a 9.5-inch tart pan with non-stick cooking spray, and line 1 small baking dish (1 cupcake, 1 mini springform, etc.) with parchment and set on a large cookie sheet (this way if anything drips, it will fall on your cookie sheet and not the bottom of your oven).  Set aside.
Melt butter and brown sugar in a heavy duty saucepan over medium heat stirring constantly; remove from heat and set aside.
In a medium bowl, whisk flour, salt, cinnamon and baking powder. In a separate large bowl, whisk eggs and vanilla.  Add melted butter and sugar mixture and whisk until combined. Slowly whisk in dry ingredients just until combined. Fold in chopped apples and cinnamon chips.
Pour batter into prepared baking pans and place cookie sheet in pre-heated oven for 25-35 minutes or until a knife comes out clean from center.  The small baking dish will most likely be finished a few minutes ahead of the 9.5 inch tart pan, so keep an eye on it.  
Allow to cool almost entirely in the pan.  When ready to cut, separate pan by carefully running a knife around the edges and then pushing up from the center of the bottom of the pan.

LinkWithin

Related Posts with Thumbnails