Recent Posts

Saturday, August 28, 2010

Canning: Homemade Tomato Sauce

Photobucket

One of the first things I asked my grandmother for when I moved into our house was her tomato sauce recipe.  Grammy's tomato sauce was pretty famous (well, at least it was within our family) and she always had a ton of it on hand for any dish that required it.  As soon as I got that recipe from her, I began making my own sauce every couple of months and storing it in pre-portioned vacuum sealed bags in the freezer.  It is kind of a long process to make Grammy's sauce - It has a few different stages and each stage requires some bubble and simmer time, so it is not something you can just whip up whenever you want.  But it is definitely worth all the time stirring and watching.  

Now that I'm about to embark on full time Student Teaching, I knew I wouldn't have time to make Grammy's sauce for a while.  But pouring the sauce into the freezer bags, using the vacuum sealer without getting sauce everywhere, and storing not quite flat bags in the freezer was getting old.  When I got this month's issue of Food Network Magazine, I saw they had a section dedicated to preserving jam.  I thought, well if you could do it with jam, you could probably do it with tomato sauce too, right?  After some web browsing, I found out that it IS possible, you just have to be careful with your recipe to prevent poisoning your family :)  Which means no meat, no fats, and limited low-acid ingredients in the recipe.  If you google it, you'll find a ton of different recipes suitable for canning.  This site was particularly helpful, as was the article in Food Network magazine which has pictures of every step.  Most importantly, be diligent with the sanitizing!  Here was our process:

You'll need:
--A big big pot - big enough to fit the jars, a small rack for the jars to stand on, and enough room on top of the jars so that they can be covered by boiling water
--Canning jars with new lids and bands
--A canning rack or a small wire rack that fits inside your big pot.  If you don't have one or can't find one (like me), you can use silverware.  Criss cross some silverware at the bottom of your pot so that you can place the jars on top of them.  You just need some space between the bottom of the jars and the bottom of the pot.
--Tongs
--A funnel
--A ladle
--Clean kitchen towels

1. Pre-clean the jars, lids and bands with hot, soapy water.  
Photobucket

2. Sterilize the jars: Place the jars on top of you rack or silverware.  Fill the pot with water and boil for at least 10 minutes to sanitize.  Keep them in the simmering water until you are ready to fill them.  Put the lids and bands in a smaller saucepan of simmering (NOT boiling) water until ready to use.  
Photobucket

3. Using the tongs, remove a jar from the boiling water.  Pour out the water and place the sanitized jar on one of the clean kitchen towels.  Using a clean funnel, fill the jar with sauce leaving about 1/4 inch at the top.  Repeat this step with the other jars to use up all of the sauce.
Photobucket

4. Using tongs, remove lids from the simmering water and place on top of the jars.  Remove the bands from the water and hand-tighten (do not over-tighten) the band.  

5. Processing: Put the filled jars back on top of the rack in the pot of water.  Cover with at least 2 inches of water and cover.  Bring to a boil and let boil for 35 minutes.  
Photobucket

6. After the processing time, remove the jars from the water with the tongs and place on a clean kitchen towel in an area where they will not be disturbed for 24 hours.  A vacuum seal will form (you might even hear a POP of the lid getting sealed on!)

7. After 24 hours, use your finger to lightly press in the center of the lid - it should not pop at all.  Vacuum sealed jars can be stored at room temperature until ready to use.
Photobucket

It wasn't so bad, it was just a little bit time consuming.  The process is pretty much the same for preserving other things like jams and jellies (processing times will probably differ according to the recipe) so once you learn how to do it you can preserve anything.  Best of all, only the lids are not reusable.  Your jars can be used over and over again.  

Friday, August 27, 2010

Homemade White Whole Wheat Pasta

Photobucket

This coming Monday, I make the transition from years and years of being a student to now being in the teacher position.  I'm in my last semester of my graduate degree.  Come December I'll have a masters degree in Art Education and I'll be fully certified to teach Art in Florida.  Since it is my last semester, that means full time student teaching/interning - I'll be spending 7 weeks in a High School Art classroom and 7 weeks in an Elementary school classroom.  I'm very excited, anxious, eager, nervous, and a whole lot of other adjectives.  I know I'm going to learn SO much about how to teach and I'm really looking forward to this experience!

That being said, the weeks leading up to internship have been filled with lots of things I know I won't have the time to do during the school year.  I've been doing lots of wedding things (Just 57 days until the Big Day!), like putting together favors, finalizing details, dress fittings, hair trial runs, and more.  I've also been spending a LOT of time in the kitchen cooking and baking because I know sadly I won't have as much time to do those things as I do now.  

I know I don't talk about Cooking very often on this blog, but I do actually like to cook very much.  Maybe that's because dinner doesn't stick around long enough to get photographed (it usually get devoured as soon as it is done).  Or maybe it's because chicken parmigiana just doesn't look as cute in pictures as a stack of brownies does.  But my-really OUR because the wonderful fiance helped tremendously with this one-latest cooking escapade definitely warrants a blog post.  

For my bridal shower, I got a Pasta Excellence Set for the KitchenAid mixer along with a "Greatest-Ever Pasta Cookbook"!  I was SO excited to get this - it comes with a pasta roller, a spaghetti cutter, a thick noodle cutter, an angel hair cutter, a fettucini cutter, and a ravioli maker.  The cookbook I got along with it is perfect for beginners - it explains every step of the pasta-making process in detail and shows pictures at each stage.  Very helpful when you're attempting this task for the first time!  We made the book's Basic Egg Pasta Dough (with some slight alterations which I'll include below) for our first Pasta-Making Session.

Basic White Whole Wheat Egg Pasta adapted from the Greatest-Ever Pasta Cookbook
4 Cups White Whole Wheat flour
1 1/2 Cups All Purpose Flour (both flours together should weigh 600 grams)
6 eggs, room temperature
2 tsp sea salt
1/4 Cup water, for use as needed

1. Sift the flours together and make into a mound on a clean work surface.  Use your fingers to make a deep well with high sides in the center of the mound.  
Photobucket

2. Crack the eggs into the well and add the salt.  With a fork, mix the wet ingredients together and slowly start incorporating flour from the sides of the mound into the wet ingredients.  Be careful to not break the sides of the well or spill the wet ingredients over the sides of the mound or you'll have a big mess.  Be patient, this is going to take a while.
Photobucket

3. When enough flour is mixed in that the mixture in the center is no longer liquid, use your hands to work the ingredients together into a sticky dough.  Get all of the sticky mixture off of the work surface and work into the dough ball.  If the dough seems too dry, start adding water by the Teaspoonful into the dough.  If it is too moist (a problem which I didn't have), add some flour.  

4. Form a rough ball and knead it.  Take the heel of your hand, and push the dough away from you.  Fold it back on itself and repeat.  Be sure to turn the dough and continue kneading every few minutes.  After several minutes of kneading like this, you could throw it in your KitchenAid mixer with the dough hook attachment and knead it for a few minutes to help form the dough.  You will likely still need to knead it by hand a bit after this, but it helps speed up the process.  Thorough kneading is very important!  Your dough isn't kneaded thoroughly unless it is very smooth and has some elasticity.  This is the hardest step!

5. Wrap the dough in plastic wrap and allow to rest for 15-20 minutes at room temperature.  It will be ready to roll after this waiting period. *If you plan on making ravioli, now would be a good time to prepare your filling!

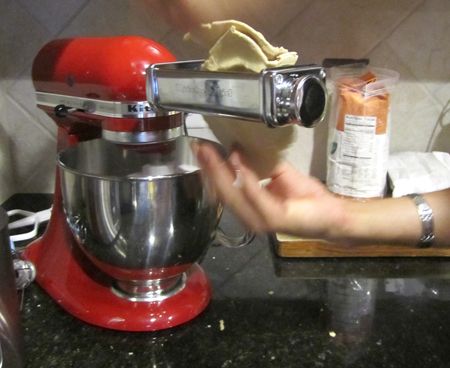
Now, break out the Pasta Roller!
Use it on the thickest setting at first (#1).  Break off a chunk of dough slightly larger than a golf ball.  Use your fingers to press it down into a rough sheet.  Put it through the pasta roller on the widest setting a few times.  Next, take it to the next setting on the pasta roller - a little bit thinner (#2).  Run it through this next setting a few times.  Then, fold the dough in half and insert the folded end into the roller.  Run it through a few times like this before moving it up to the next setting (#3) and repeat all the way until the dough is rolled out at the #4 setting.  If the dough is forced to go through the roller on too-thin of a setting when it isn't ready, it will break apart and will likely get too dry to be able to be used at all (we learned this the hard way).  As you make pasta sheets, lay them out on your clean work surface and cover with plastic wrap as you make the rest of your sheets.
Photobucket

When the dough is at the thickness of the #4 setting, it is ready to be made into pasta.  We made it into a variety of pastas - 
Some spaghetti:
Photobucket

As you cut the spaghetti, put on a lined cookie sheet and toss with flour to prevent the dough sticking together.  
Photobucket

Roughly form little "nests" with the spaghetti.  
Photobucket

Now you can do one of three things:
1. Allow the pasta to dry for one hour and then throw it in boiling water for around 4 minutes and eat it!
2. Allow it to dry for a couple of hours until it feels a little bit stiff but not as stiff as boxed pasta.  Then, plastic wrap or zippy bag the nests and freeze until ready to use.  You can put the home-made frozen pasta into boiling water for about 4 - 5 minutes and it'll be ready to eat.  Consume within 3 months.
3. Let the nests dry for 24 hours until it feels stiff like boxed pasta.  It can be stored in airtight storage containers in the pantry.  Consume within 3 months.  
Voila! Home-made pasta ready for whenever you want it!

Photobucket

We made lots of ravioli, too:
Photobucket

Photobucket

Photobucket

To make the ravioli is surprisingly easy!  Take a long sheet of pasta dough, fold it in half and insert the folded end into the ravioli attachment.  Using the hand crank, turn the knob one quarter turn to feed the pasta sheet. Take the filling scoop and insert 1 - 2 scoops of the filling of your choice (2 ideas below!).  As you turn the hand crank, the filling automatically fills in the little pockets of the ravioli and seals the edges.  A little filling goes a long way, so don't put too much in.  If you get to the end of the dough and there is filling left, it might get a little messy.  :)
Once the sheet is completely through the ravioli maker, tear the sheets of ravioli apart at the perforations.  Lay the ravioli out on a cookie sheet lined with a clean dish towel.  Allow to dry for one hour before cooking.  The raviolis will only take about 4 - 5 minutes in boiling water to be done and ready to eat!  (Or you can freeze the little raviolis after their initial drying period and boil them up whenever you want them).  

With ravioli fillings, you can get pretty creative.  Just one thing to keep in mind is that fresh ravioli only need to boil for 4 - 5 minutes, so anything you put in should be fully cooked.  In our first ravioli making sessions, we made two fillings:

Spinach and Ricotta Cheese Ravioli Filling:
3 Tblspn unsalted butter
6 oz fresh spinach, washed and shredded
1 Cup ricotta cheese
1/3 Cup grated Parmigiano-Reggiano cheese
a pinch of nutmeg
1 egg, room temp
sea salt and pepper to taste

Melt the butter in a small saucepan.  Add the spinach, salt and pepper and cook for 6 - 8 minutes on medium heat.  Stir frequently until the spinach is wilted.  Increase the heat to high and stir for a few minutes to dry out the spinach a little bit.  Transfer to a mixing bowl and allow to cool.
When cool, add ricotta, grated cheese, and nutmeg.  Mix well, taste for seasoning.  Then when you're happy with the seasonings, add the egg and mix well.  It is ready to be put into ravioli!

Spicy Sausage and Spinach Ravioli Filling:
1 Tblspn olive oil
2 spicy italian sausage with the casings removed
1 Cup ricotta cheese
3 oz fresh spinach, washed and shredded
1 egg, room temp
Grated cheese, salt, and pepper to taste

Over medium heat, cook the sausage in a small pan until meat is browned and cooked thoroughly, and a lot of the liquid has cooked away.  Remove to a mixing bowl and allow to cool.
Add the olive oil and spinach to the still hot pan and cook, covered, until wilted.  When it has wilted, gently squeeze some of the liquid out of the spinach and discard the liquid.  
Mix the sausage, spinach together with the ricotta, grated cheese.  Add grated cheese, sea salt and pepper and taste for seasoning.  If you're happy with the seasoning, add the egg and mix well.  It's ready to be put into your raviolis!

So that I could get a feel for the taste of the ravioli, I didn't want to cover it in a red sauce.  Instead, I made a simple Browned Butter and Sage sauce.  It is so simple I hesitate to even call it a sauce, but it is soo good.  Browned butter is nice and nutty and has much more depth as a result of browning.  When you add sage and sea salt... you'll just have to try it to understand.

Browned Butter and Sage sauce
3 Tblspn butter
8 - 12 leaves of Fresh Sage, washed and dried
Sea Salt for serving
Grated parmigiano-reggiano cheese for serving

Melt the butter on medium heat and add the sage leaves.  Cook it over medium heat until it browns.  Here is a little tutorial on how to brown butter if you're not familiar. 
When cooking your pasta, save a little bit of the pasta water when straining.  Add the browned butter and sage to the pasta water and pour over your pasta.  Sprinkle sea salt on top of your pasta, add some grated cheese and enjoy!  (Adding sea salt brings out the flavor of the browned butter as well as the sage.  Without it, it'll just taste like.. butter.  So skipping the sea salt is NOT ok!!  You'll be missing out!).  

Photobucket

Here is only our spread of the pasta we made that night:
Photobucket

WHEW, that was a long post.  I suppose it makes sense because the pasta-making was a long process.  But it was a lot of fun.  Actually since then, we've actually made MORE pasta.  I can't wait to play around and make all kinds of different flavors or pasta dough.  I'd definitely recommend this recipe for the ravioli dough as it was nice and simple and really let the flavor of the filling shine through.  However next time I'd probably make something a little more flavorful for the spaghetti and non-stuffed pastas.  But don't get me wrong, it was still delicious. :)

Next post up before Student Teaching starts?  Canning home-made Tomato Sauce!  You'd never guess me and the fiance are in our mid twenties, you'd think we were little old Italian women.  At least we eat well!

Sunday, August 22, 2010

SMS: Sweet Almond Cake with Lemon Curd and Lemon Mascarpone Frosting

Photobucket

Sometimes adding a garnish can make or break the appearance of a cake.  A cake can be absolutely delicious, but if it doesn't look appealing and inviting, everyone might pass on it.  Which of these would you rather dig into?

Photobucket

or 

Photobucket

Yep, definitely the one with the cute garnish.  I'm glad I added the chopped almonds to the top or else people may have passed on this seemingly plain cake and they would have missed out on the out-of-the-box complex flavor of this week's Sweet Melissa Sundays recipe.  Everyone here who taste-tested it seemed to enjoy it.  It definitely doesn't taste like something I make all the time.  And the change was welcomed.

There were a lot of steps to this dessert, but everything went rather smoothly.  No hiccups or hurdles in this cake making.  But... a lot of ingredients did go in to this cake.  I mean...

Photobucket
Woah, butter.

Photobucket
And woah, egg whites.

Photobucket
A lot of egg whites means a lot of meringue!

But I think it was worth it.  I even learned a new technique for cutting cake layers in half.  Thanks, Melissa Murphy!  And thanks Dan, my wonderful fiance and sous chef whose hands appear in the following pictures :)

Photobucket

Photobucket

I loved the toothpick marking technique to cutting a cake layer straight mentioned in the cookbook!

Photobucket

Photobucket
Look how nice and even the split layers are!

After it was frosted, I laid a small bowl lightly on the surface of the cake to mark off the area I wanted to keep the chopped almond garnish off.

Photobucket

Photobucket
And it worked pretty good!

Photobucket

Photobucket

Boy was it a heavy cake!  Carrying it in the cake carrier to family dinner was definitely a two handed procedure.  But it was definitely good.  The lemon curd filling was pretty easy to throw together and had a wonderful tart lemony taste.  The cake was nice and moist and have a great almond flavor.  And the frosting... oh the frosting.  The lemon mascarpone frosting was surprisingly subtle in the lemon department and it wasn't overly heavy despite the mascarpone.

Thanks for picking this recipe and hosting this week, Katie!  Check out katiecakes, Katie's blog for the recipe.  And see the list of this week's SMS participants here.

Tuesday, August 17, 2010

50 Best Cupcake Recipes on the Internet

Photobucket

This afternoon while sitting at home letting my novocaine wear off (being a dessert lover is not without its punishments... 3 cavities filled today), I was catching up on some blog reading and saw that All Things Cupcake mentioned a post by Restless Chipotle called the 50 Best Cupcake Recipes on the Internet.  Sounds amazing, right?  I know, so I had to go check it out.  What did I find?  My very own Turtle Brownie Cupcakes made the list!  How exciting!  I am very honored to be included!  

You'll definitely want to check out this collection of cupcake recipes on Restless Chipotle.  I mean... Browned butter banana rum cupcakes?  Apple crisp cupcakes?  Snickerdoodle cupcakes?  Yep, you'll definitely want to read all 50 recipes... and eat them, too.  

Thanks Marye at Restless Chipotle!!

Sunday, August 15, 2010

Sweet Melissa Sundays: Cherry Almond Granola

Photobucket

When SMS was still pretty new, we made Melissa Murphy's Granola Breakfast Cookies.  When I made this granola for those cookies, I scaled the recipe down considerably and made quite a few substitutions.  This time around, I stuck to Melissa's original recipe much more closely.  I only left out the dates, and I added a little bit of flaxseed (about 1/2 cup).

It was hot here in Florida yesterday.  Since it was really too hot to be outside, we tried to stay indoors most of the day.  But for those few minutes that we were outside, it felt like we were standing inside a preheated oven.  There was no breeze, not even a slight one so all we could feel was the heat.  Whew!  But if you took a step inside my house, you'd think it was the middle of fall judging by the smell coming out of the kitchen.  The Granola with ginger, allspice, nutmeg, cinnamon and cloves, maple syrup and honey browning slowly in the oven let out the most delicious autumny smell.  I wish I could have taken a picture of the smell!  And the taste of the final product was delicious, too.  Not too sweet, and not too spicy.

Photobucket

Photobucket

Thanks so much for picking this recipe and hosting this week, Wendy!  I'm sure the recipients of my little granola gift packages will want to thank you!  Check out Wendy's blog, Pink Stripes, for the recipe.  And click here to see the list of this week's SMS participants.

Sunday, August 8, 2010

Sweet Melissa Sundays: Chocolate Raspberry Truffle Torte

For about two weeks, I was on vacation in New York visiting family and friends.  We had a great trip, and everyday our schedule was filled to the brim.  We got to visit friends we hadn't seen in a long time, spent lots of time with family, took a trip to NYC to the MOMA (and eating cupcakes of course), went to Six Flags Great Adventure, watched my little brother compete for state in Little League, and had a wonderful bridal shower that my mom, aunt and sister threw for me.  Somehow, in the middle of all that, I found some time to make this week's Sweet Melissa Sundays recipe, a Chocolate Raspberry Truffle Torte, with my sister at her house.  Please forgive the horrible pictures!  


Before beginning, I took advantage of the fact that I was in NY and bought some nice high quality belgium chocolate for the recipe:
Photobucket


Photobucket


Yum.  I bought a few extra massive chunks to bring home with me, of course. :)


It's always harder baking in someone else's kitchen.  Just because you don't know where everything is and what they have, but we made due.  Though, I'm not sure if mine came out right or not...  I did substitute Godiva Liquor for the Rum... I wonder if that had anything to do with it?  


First, I poured the delicious smelling batter into a springform pan... and when half of the batter barely covered the bottom of the pan, I realized my pan was actually a 12" Springform - far too big for this recipe.  So we poured it over into a 9 inch long glass dish:
Photobucket


After it finished baking and cooling all the way it looked like this:
Photobucket


Photobucket


Here is my lovely sister modeling it:
Photobucket


If I had to describe the texture of this Torte, it would be somewhere around mousse I suppose.  Is that how everyone else's came out?  When we served the first slice after about 4 hours of chilling in the refrigerator, it came out like this:
Photobucket


Kind of a mess.  But when my stepfather had it a little later on, it came out of the pan a little more neatly.  He was even able to pick it up like it were a brownie.


It tasted delicious.  Everyone who tried it absolutely loved it.  I'm just not sure if this is the result I was supposed to get.  The taste of the godiva liquor came through a bit to the finished product.  And the blackberries (I substituted blackberries for the raspberries) were a really nice contrast to the softness of the Torte.  I can't wait to see everyone else's to see!  


Thanks for hosting this week, Jennifer!  Be sure to visit Jennifer's blog, The Rookie Baker to see the recipe.  And click on over to the list of bakers who participated this week to see how everyone else's came out (maybe quite different from mine!)  
Also, has anyone ever heard of Giveaway Scout?  Seems like a cool way to find out what blogs are doing giveaways!  And if you happen to be doing a giveaway on your own blog it's a great way to get info of your giveaway out there to a larger audience! 

LinkWithin

Related Posts with Thumbnails