Recent Posts

Saturday, June 22, 2013

Easy Fourth of July Cupcake Tower

Sometimes (ok, the majority of the time) you want to make a big statement with your dessert display, without spending hours and hours in the kitchen.  When you're having a party, you just don't have the time to painstakingly make teeny tiny fondant shapes to go on 60 cupcakes.  You've got other things to do like clean the house, put up decorations, make the food, set up chairs, etc.  This Easy Fourth of July cupcake tower looks impressive without taking a long time or putting in lots of careful effort to make it look that way.  


Things you will need: 
(I left out amounts of everything so you can adapt to your own party's size)

  • Your favorite cupcake batter
  • Your favorite frosting 
  • Red & white striped liners
  • Card stock that can go in the printer
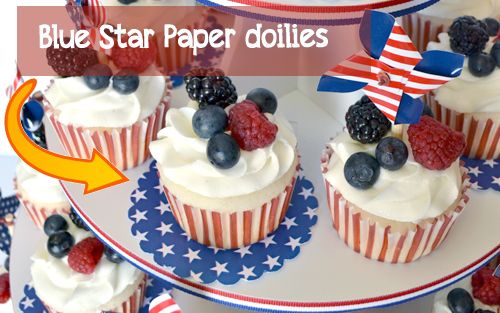
  • Blue star pattern circle printables
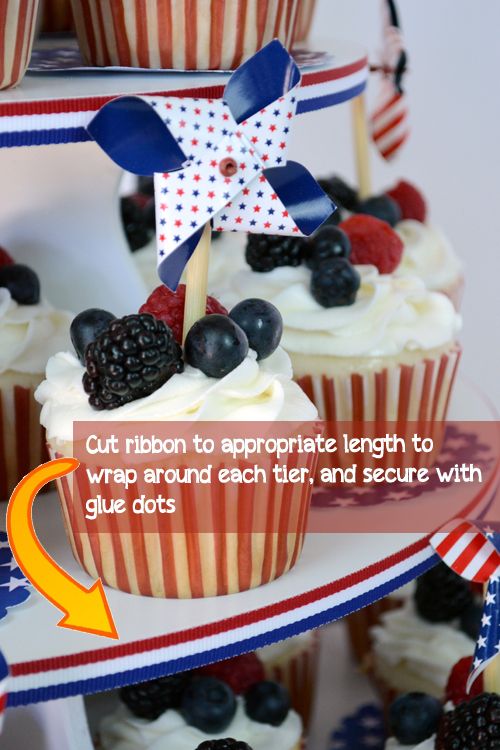
  • Red, White, and Blue striped ribbon
  • Glue dots (or other method for attaching ribbon to the cupcake tower) 
  • fresh blackberries, blueberries and red raspberries, rinsed and dried (for about 65 - 70 cupcakes, I used 1 quart of each type of berry)
  • small fourth of july themed pinwheels

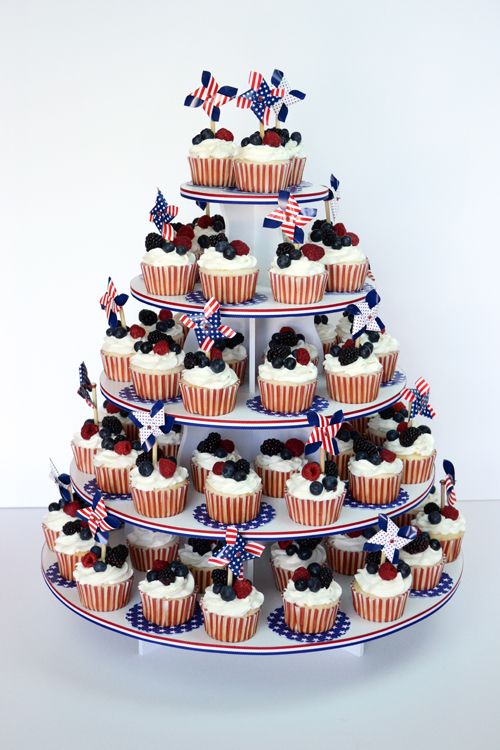
  1. First, we baked up simple vanilla cupcakes in red and white striped liners that we picked up at the craft store.  We made about 64 cupcakes.  
  2. While those were baking, we printed out blue star pattern circles on card stock and punched them out into cute little doily shapes with a paper punch (similar to this one) though you could easily just cut them into squares or circles with regular scissors.  If you want to decorate your tower like we did, you'll need half as many doilies as you have cupcakes.  We alternated: 1 cupcake with a blue star doily, 1 cupcake with a pinwheel, etc. 
  3. Use glue dots to attach the red, white and blue striped ribbon to the edge of each tier of the tower.  
    • Steps 1 - 3 can all be done in advance! Doing these 1 - 2 days before your event is fine!
  4. Frost the cooled cupcakes
  5. Decorate the cupcakes with the berries.  I used 3 blueberries, 1 blackberry, 1 red raspberry on each cupcake.  Gently press into the frosting.
  6. Place all cupcakes on your The Smart Baker Cupcake Tower.  
  7. Alternate decoration types on the cupcakes: 1 cupcake gets a pinwheel, the next one gets a blue star doily, next one gets a pinwheel, the following gets a doily, etc.
Voila! You're done! That's it!  This was quick and easy to do.  If you use a box cake mix, or buy plain, frosted cupcakes from the grocery this would be even quicker.  Everyone will think you spent hours making your impressive Fourth of July dessert display!


Friday, June 21, 2013

Cracker Jack Snacks and a GIVEAWAY

Baseball was a big part of my family growing up.  Of course, we'd often go to Shea Stadium and watch the Mets play (though if I remember correctly, I was pretty much only interested in the soft serve ice cream served in a little plastic Met helmet).  However, Little League was a much bigger part of our lives than major league games.  I was the only child who never played (I've never really been much of a competitive athlete... unless bake-off's count) but my older sister played when she was little and my younger brother played from the time he was very young until he aged out.  My father was even (and still is!) the president of the local little league.  

My brother is much younger than my sister, Jenn, and I (10 years younger than me, and 12 years younger than Jenn) so by the time my brother was playing, we were old enough to help out during his games.  While dad was doing his presidential duties, my sister and I would often help out in the snack shack.  My favorite part of helping out was when our shifts were over, and my sister and I would grab a bag of Cracker Jack snacks and a soda, and we'd share it as we sat on the bleachers and watched the rest of Christopher's game.  When I think of Cracker Jack snacks, I remember those summer nights talking and laughing on the bleachers with my sister, cheering on my little brother as he pitched his heart out.  

The Cracker Jack brand has been around for 120 years (isn't that amazing?!).  In celebration of this big anniversary, they're putting out new flavors, improving on the original variety, and modernizing their prizes.  I was lucky enough to sample the new flavors, Butter Toffee and Kettle Corn.  Both of which were delicious... I can't tell which one I enjoyed more.  The Butter Toffee variety could satisfy any sweet tooth, while the Kettle Corn had a more subtle sweetness, and kept me coming back for another handful, time after time.  


Giveaway:  Cracker Jack snacks has offered to giveaway 6 bags of the 3 assorted flavors to one lucky reader of Ice Cream Before Dinner!
a Rafflecopter giveaway


*Details and rules:
  • Open to residents of the U.S. only
  • Giveaway will end Friday, June 28, 2013 at 12:00 AM EST.
  • Giveaway will be conducted via rafflecopter (www.rafflecopter.com)
  • Winner will be announced by Tuesday, July 2nd, 11:59 PM EST.
  • Winner will be notified by email and will have until Friday, July 5th to claim their prize and provide their mailing address, after which, if the winner does not respond with their mailing address, another winner will be selected.
  • Winner will receive 
  • 6 bags of the 3 assorted flavors of Cracker Jack snacks provided directly from Cracker Jack brand.
  • Disclosure:
  •   The Cracker Jack snack products were provided to me by Cracker Jack brand for my participation in this blogging/trial program.  Any and all opinions posted on this blog are based on my own experiences with the Cracker Jack brand products.  Cracker Jack brand provided the product for the giveaway for my review on this blog and for the giveaway.  I was not compensated for my participation.

Wednesday, June 19, 2013

Key Lime White Chocolate Chip Cookies

Recently, we took a weekend trip to the Sarasota area.  It's only about 2 1/2 hours away, yet we had never made the relatively short journey over.  I'm glad we finally decided to spend some time there because we loved it there.  In just a few days, we visited Sarasota, St. Petersburg, Tampa, Siesta Key, and Longboat Key.  Some of our favorite things from our trip involve food (obviously).  First, we thoroughly enjoyed visiting The Lollicake Queen and Perq, and meeting the wonderful, kind, creative minds behind the two establishments (more on that to follow in a later blog post).  We're a bit jealous of people who live in Sarasota and get to have their lollicake cake pops whenever they want!  
As you can see, we enjoyed our fair share of lollicakes :)

We also enjoyed wonderful dinners at Indigenous, Owen's Fish Camp, and breakfast at Station 400, all of which we'd love to go back to again! 
Second, we loved shopping at the Sarasota farmer's market.  WOW!  I wish we had something like this in our immediate area, I'd visit all the time!  It was bustling with friendly vendors, tons of customers, and lots and lots of goodies.  One thing we just couldn't resist was a pound of fresh key limes.  With them, we whipped up this batch of soft Key Lime White Chocolate Chip cookies.  These didn't last very long... always a good sign :)

PS - Do you follow us on Instagram yet?  Whenever we go on Foodventures like these, we always post pictures along the way!  


Soft Key Lime White Chocolate Chip Cookies, adapted from Cookie Madness
Ingredients:
1 stick unsalted butter, room temperature
1 cup granulated sugar
1 large egg + 1 large yolk, room temperature
1 1/2 cup all purpose flour
1 teaspoon baking powder
1/2 teaspoon fine sea salt
1/4 cup freshly squeezed key lime juice
1 1/2 teaspoons key lime zest
3/4 cup white chocolate chips

Preheat oven to 350 F.  Line cookie sheets with parchment paper, and set aside.
In the bowl of an electric mixer, beat the butter and sugar together until creamy.  Then, add the egg and yolk.  Beat.
In a small bowl, whisk together the flour, baking powder and sea salt to combine.  Turn the mixer to low and add the flour mixture.  
Next, add the lime juice and zest.  Add the chocolate chips and mix until just combined (do not over mix).  
Roll dough until 1 to 1 1/2 inch balls and arrange on parchment lined baking sheets approximately 2 1/2 inches apart.  Bake for around 10 - 12 minutes or until edges just barely begin to brown.  


Friday, June 7, 2013

Cowgirl Birthday Cupcake Tower

Here at The Smart Baker, we've made all different types of decorated cupcakes for parties.  Lately, rather than make a lot of time-consuming edible decorations I've been using Cupcake Picks as simple but chic cupcake toppers.  It is so easy to make the cupcakes match the theme of the party.  
This April was our niece Ella's 4th birthday, which she celebrated by having a party at the farm with a petting zoo and pony rides.  To go with the theme, we made her this Cowgirl Cupcake Tower.  There were chocolate and vanilla cupcakes in pink, blue and green gingham print liners, with contrasting color gingham cupcake picks with her name on them.


Monday, June 3, 2013

Highly Addictive Salted Caramel Pretzel Bark

I often make cakes, pies and tarts which require slicing before serving.  If someone wants a piece they need to very deliberately pick up a knife, grab a plate, slice and serve.  However, I really enjoy making things people can  casually snack on, too.  These things don't require knives for slicing, spoons for scooping, or even plates for serving.  These things can just be picked up and popped in one's mouth.  I think these types of things are usually the biggest hit (or at least the type with the least left over).  

This is one of my top favorite "snacking" recipes.  It is pretty easy to prepare, and results in a bite-sized, sweet-n-salty, highly addictive snack.  I found this this recipe on Mama Say What!?  and I'm very glad I did, because this was thoroughly enjoyed by all who snacked on it.  My favorite way to enjoy it is straight out of the freezer!
Salted Caramel Pretzel Bark
Ingredients:
1/2 of a 1 lb bag of mini pretzels
2 sticks unsalted butter, room temperature
1 cup lightly packed light brown sugar
2 cups chocolate chips of your choice (I used semisweet)
Fine sea salt (I always use Diamond Crystal)

Preheat your oven to 350 F.

Line a large jelly roll pan (or two 9x13 pans) with precut parchment paper.  Carefully, line the trays with the mini pretzels making neat rows, placing the pretzels right up against each other.  

In a medium saucepan on medium heat, melt the butter.  Add the brown sugar and stir.  Allow the sugar to dissolve and let it bowl gently just until it starts to stick to the bottom and it forms a nice smooth caramel.  Let it bubble and little and get nice and thick.

Remove from heat, and pour evenly over the rows of pretzels.  Put in the preheated over for 5 minutes (this will help the caramel spread out even more evenly).  Remove from the oven and sprinkle the chocolate chips over the top.  Place back in the oven for just 1 minute, and then spread the chocolate chips around with a offset spatula until mostly melted.  

Sprinkle generously with sea salt, and allow to cool at room temperature for a few minutes.  Then place in the freezer for 2 to 3 hours, until completely frozen.  When frozen, break it up into pieces and serve.  (I like to keep it in the freezer until I serve it).  

LinkWithin

Related Posts with Thumbnails