


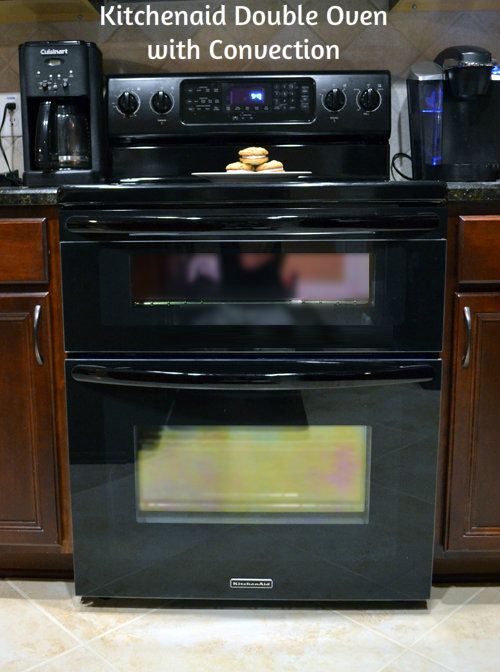
What could be more fun for an avid baker than shopping for a new oven? About two months ago, we updated our oven with a Kitchenaid Double Oven with Convection. Here is a review of what I've found out about it so far.
I'm kind of funny with certain things when it comes to baking. After a lot of experimenting, I've come to the conclusion that when baking certain things, anything other than the middle rack has a different effect on the final product (even if you rotate halfway through). When baking cupcakes, those that start out on the top rack always dome much more than those that start in the middle. As a result I very rarely use any rack other than the middle, which means I used to have to heat up the whole oven just to use the middle rack. The second and third pans of cookie dough or cupcake batter would have to wait until that middle rack was free to take their turn in the oven. Being pretty energy conscious, I always felt pretty guilty about this.
Another thing I ran into a lot when baking was competing for use of the oven. Since I bake pretty often, something dinner and dessert baking time coincides. In a standard oven, you have to choose. Sometimes that means having to wait a couple of hours for dinner if I really needed to finish baking up that big birthday cake.
The solution to these problems? A double oven. This kind of double oven takes up the space of one standard oven (it's not like the two standard size wall ovens). We got the Freestanding Electric 5 Elements Even-Heat™ True Convection System Architect® Series II by Kitchenaid (whew, that's a mouthful). The single baking area is divided into 2 sections: 1 smaller section (around 1/3) and one larger section (around 2/3). This means I can use my top smaller oven for baking things on just the "middle rack" (even though there is only one rack) and not feel guilty about wasting all that pre-heated oven space. The bottom, larger, convection oven has two racks, and is large enough to bake tall things (like a big turkey if I were to even make one).
So how does it work? Terrific so far! The top smaller oven, since it is smaller, pre-heats far quicker than my old larger one did (perfect for those impatient I-forgot-to-preheat-and-now-my-batter-is-ready moments). I've baked all sorts of desserts in there and many dinners and everything turns out wonderful. I use this one 75% of the time. The bottom convection oven also works beautifully. When I'm baking a ton of cupcakes, I use both ovens and this greatly speeds up my production time. The convection fan is very quiet, and the "Easy Convect" feature takes all the guesswork out of using convection - you put in your bake time and temperature, and it makes the proper adjustments for baking with convection.
The Con's? There are a few small quirks I've noticed about it in the past two months of using it. First, probably the weirdest thing, is using the "Easy Convect" feature. Once you put in the bake time and temperature information, it automatically starts preheating. However, it also starts counting down! For example, if I were baking a cookie recipe that calls for 350 degrees F for 8 minutes, it would tell you that it should bake at 325 in a convection oven for 8 minutes - the oven turns on and the counter begins to count down from 8:00. The problem with that? Well, it begins counting down and the oven is not preheated yet! There is no way to stop the timer and allow the oven to preheat. Kitchenaid's solution to this is add 15 minutes to your bake time to account for preheating time. This is a little odd, no? So instead, I typically do the calculations with "Easy Convect," then turn the oven off (to stop the counter) and then just start pre-heating the oven as normal with the information it told me to. Plus, I'm not so sure that convection really shortens bake time all that much. In the scheme of things though, this isn't such a big con and it can easily be worked around.
Another con, and this one is more annoying that than Easy Convect quirk, is with the stove top. Sometimes, I notice if the dial is not exactly on one of the dots, the power may not remain on. If the dial is between dots, it may occasionally turn off. I've had pots of water sit on the burner for about 20 minutes before I've realized it's not boiling - not even hot - because there is no electric! I never experienced this issue with my old electric oven.
All in all, I absolutely love this new oven and would not go back to my old one. The convenience of having two ovens that you can preheat to two separate temperatures, as well as the energy savings of having just one small oven greatly outweighs any cons the oven may have.
Would you like to see the results of my first baking experiment in the new oven? After getting the new oven, I was curious to see what effect the convection had on the final product. Would it come out drier or moister? Would it bake up taller? Spread out more? So I made one batch of same cookie batter and baked half of it in the top, regular oven, and the other half in the bottom, convection oven. Take a look at the side by side pictures to see for yourself.
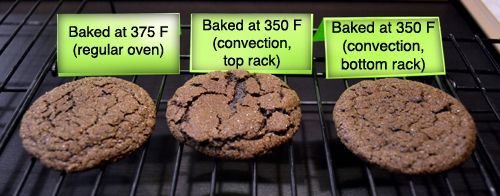
The cookie on the left was baked in the regular oven at 375. Easy Convect told me to use 350 degrees in the Convection oven, so the middle cookie was baked at 350 in convection, on the top rack. The cookie on the left was baked in convection at 350 on the bottom rack (kind of placed in the middle of the oven).
The top rack convection looks different, but all the cookies tasted pretty much the same. No cookie was more or less moist than another. It did seem like the cookies baked in the regular oven stayed a little taller and did not flatten out as much as the others. For the most part though, there wasn't a huge difference between the different ovens.
I'll have to do another similar experiment with a batter than baked up higher, like a cake or cupcake recipe. So, more experiments to come! But for now, on to the cookie recipe! These were delicious. They were slightly crispy on the outside thanks to the sugar coating and were nice and chewy on the inside. With some, I spread a little biscoff on them and made delicious little chocolate spice cookie sandwiches. Mmm.
Mexican Hot Chocolate Cookies, adapted from Martha Stewart
Ingredients:
- 2 1/4 cups all-purpose flour
- 1/2 cup unsweetened cocoa powder
- 2 tsp cream of tartar
- 1 tsp baking soda
- 1/2 tsp fine sea salt
- 1 cup unsalted butter, room temperature
- 1 3/4 cups sugar
- 2 large eggs, room temperature
- 1 tsp pure vanilla extract
- 2 tsp cinnamon
Preheat oven to 375 degrees (or 350 for convection). In a medium bowl, whisk together flour, cocoa powder, cream of tartar, baking soda, and salt. In the bowl of an electric mixer, beat the butter and 1 1/2 cups sugar on medium speed until light and fluffy, about 2 minutes. Scrape down side of bowl. Add eggs and vanilla and mix just to combine. With mixer on low, gradually add flour mixture and beat until combined.
In a small bowl, combine remaining 1/4 cup sugar and cinnamon. Using heaping tablespoons, form balls of dough and roll in cinnamon-sugar mixture. Place, about 3 inches apart, on two parchment-lined baking sheets. Bake until cookies are set in center and begin to crack, about 10 minutes. Let cookies cool on sheets on wire racks 5 minutes, then transfer cookies to racks to cool completely.


