Recent Posts

Tuesday, March 29, 2011

Banana Bran Muffins

Photobucket

Banana Bran muffins??  A healthy recipe?!  Has this blog been taken over by a health nut?  Nope.  But now that I'm leaving early for work, I wanted to make something I could quickly grab on my way out the door to hold me over until lunch.  Store bought breakfast bars were getting old.  These came out quite good, but their shelf life is rather short.  I made these Thursday night and by Tuesday morning when I opened the airtight container, out came a spoiled smell.  So if you plan on making them and you don't feel like eating 12 muffins in a few short days, bring them to work and share with your co-workers!  I made them in a standard cupcake/muffin pan, but if they had been prepared in a jumbo muffin pan, the recipe probably would have only yielded around 6.  A much easier number of muffins to eat in a few days! :)  


Banana Bran Muffins, adapted from Food 4 Thought
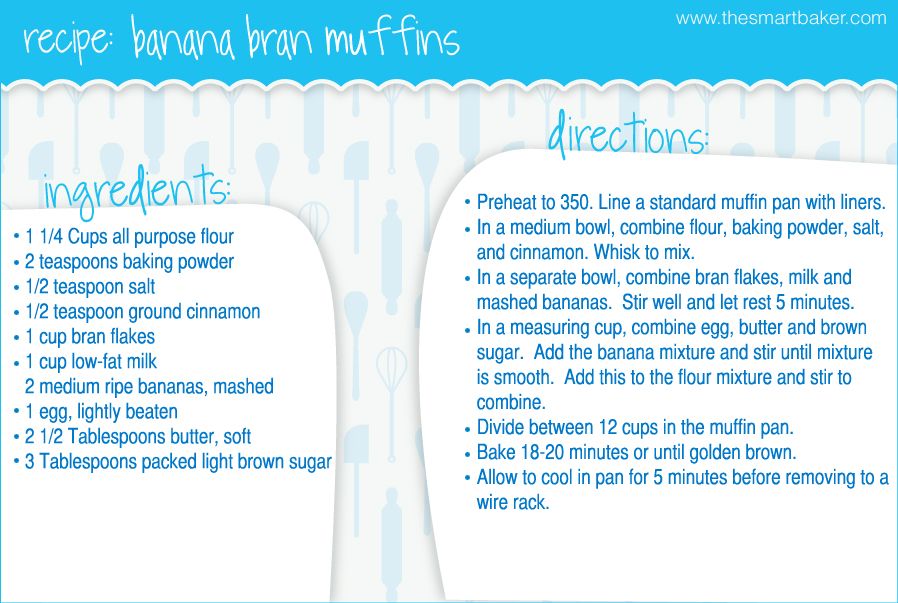
Ingredients:
1 1/4 cup all purpose flour
2 teaspoons baking powder
1/2 tsp salt
1/2 teaspoon cinnamon
1 cup bran flakes
1 cup low-fat milk
2 medium ripe bananas, mashed
1 egg, lightly beaten
2.5 Tablespoons butter, softened
3 Tablespoons packed light brown sugar


Preheat to 350 and line a 12 cup muffin pan with paper liners.
In a  medium bowl, combine flour, cinnamon, baking powder and salt.  Whisk to combine and set aside.
In a separate bowl, combine the bran flakes, milk and mashed bananas.  Stir well and let rest 5 minutes. 
In a measuring cup, combine the egg, butter and brown sugar.  Add the banana mixture and mix just until mixture is smooth.  Add this to the flour mixture and stir to combine. Divide between 12 wells in the cupcake pan. 
Bake for 18-20 minutes or until golden brown.  Allow to cool 5 minutes before removing from the muffin pan to a wire rack to cool.


Photobucket

Sunday, March 27, 2011

Snickerdoodle Blondies

Photobucket
Pillsbury is accepting entries for their March 2012 Bake-off NOW!  Are you entering your favorite recipe?  The prizes are incredible, so you probably should!  How does 1st place - $1 million + $10,000 in GE Kitchen appliances sound?  And several $5,000 + $3,000 in GE appliances prizes?  Read more HERE.  100 finalists will go to Orlando to face off!  I know I'm devoting some of my spring break time to baking up and testing recipes!  


But for now I have another delicious recipe to share with you.  This one is not mine, it comes from one of my new fave blogs Bakergirl.  I've seen several Snickerdoodle Blondie recipes floating around the food blogger world for quite some time and have had many of them bookmarked for what seems like forever.  But some strange reason I've never made them.  It really is strange because we LOVE blondies and we LOVE all things cinnamon sugar here.  Just like the matcha shortbread cookies I kept pushing off and finally got around to baking, these Snickerdoodle Blondies were finally at the top of my To-Do list.  And thank goodness for that because these are absolutely perfect.  Soft and chewy on the inside, cinnamon-sugary crunch on top.  The most amazing combination of a snickerdoodle cookie and a vanilla blondie one could possibly imagine.  I'm saying all this and I haven't even tried one warm with vanilla ice cream on top yet!  These babies are a winner.  Don't forget to see our printable recipe card below!  Click the recipe card to open a larger printable version.  


Photobucket
Snickerdoodle Blondies adapted slightly from Bakergirl
Ingredients:
2 2/3 cups all purpose flour
2 teaspoons baking powder
1 teaspoon fine sea salt
1 1/8 teaspoon ground cinnamon
1/4 teaspoon ground nutmeg
2 cups packed light brown sugar (approximately 430 grams)
2 sticks unsalted butter, softened
2 large eggs, room temp
1 Tablespoon vanilla extract
For the topping:
2 Tablespoon granulated sugar
1 1/2 teaspoon ground cinnamon


Directions:
Preheat to 350 F.  Grease a 9 x 13 inch baking pan and line with parchment paper.  Lightly grease the parchment.
In a medium bowl, whisk together the flour, baking powder, sea salt, cinnamon and nutmeg.
In a small bowl, combine the topping ingredients and set aside.
Put butter in the bowl of an electric mixer and turn on.  When butter has been beaten a bit, add in the brown sugar and mix until very light and fluffy, about 5 minutes.
Add the eggs in one at a time, making sure to beat well after each addition, wiping down sides of bowl with a rubber spatula if necessary.  Add in the vanilla and beat.
Slowly add the flour mixture with the mixer on low speed.  Beat just until combined, do not overbeat.
Transfer batter to the prepared pan.  Use offset spatula to smooth it.
Sprinkle the cinnamon sugar topping evenly over the surface.
Bake for 25 - 30 minutes or until surface of blondies spring back when touched.
Allow to cool on a wire rack and enjoy!


Photobucket


Printable recipe card!
Photobucket

Tuesday, March 22, 2011

Matcha (Green Tea) Shortbread Cookies

Photobucket


Quick little recipe for you on this glorious Tuesday!  (I say glorious because we are just a few days away from Spring break).  My dad bought me a big bag of high quality Japanese matcha quite a while ago.  I had big plans for this green tea powder - big plans!  But they always seemed to get pushed to the side.  Finally this past weekend I got around to making a simply little shortbread cookie out of it. 


It was a cinch to put together - really!  Very quick.  And the end result was pretty tasty.  Not too green tea-ish according to Daniel and me, it is quite subtle.  But it is still a nice flavor, and perhaps it is a good thing that it is not overpowering.  These are going to one more green tea loving person for sampling, so I will update after I get their reviews.  

Photobucket

Matcha (Green Tea) Shortbread Cookies (makes about 2 dozen small cookies)
Ingredients:

  • 1 cup all purpose flour
  • 1 heaping tablespoon Matcha (Japanese green-tea powder)
  • 1/4 tsp sea salt
  • 1 stick unsalted butter, room temp
  • 1/4 cup granulated sugar
  • turbinado sugar or granulated sugar (for sprinkling) 


Directions:


  • In a medium bowl, whisk together flour, matcha, and salt. Set aside.
  • With an electric mixer, beat butter on medium speed.  Add sugar & beat until very light and fluffy.
  • Add flour mixture and mix until just incorporated.
  • Place chilled dough between two pieces of parchment.  Using a rolling pin, roll out dough to about 1/4 in. thick.  Place dough in refrigerator until firm (~30min).  
  • Preheat to 325.  Remove chilled dough from fridge and place on a cookie sheet. Peel back top layer of parchment.  Using a cookie cutter, cut out shapes from the dough.  
  • Bake until cookies are just starting to get a golden brown color around the edges.  Cool on wire rack. 


*Plus, now we've got these cute little printable recipe cards!  I'll be putting these in with my posts regularly.  Click the image below for the full size image, and you can download it and size it to whatever you'd like.  Dimensions are scalable to 4 x 6 so you can print it, and plop it right in your recipe card box. :) Enjoy!

Photobucket

Stylish Blogger

Photobucket

Recently, I got an email that I received a Stylish Blogger award from Stephanie at Cupcakes and Sundry.  Thanks so much Stephanie!  I'm completely flattered.  Cupcakes and Sundry is a great food blog that you really shouldn't miss (umm Coffee & Donut cupcakes?! YUM).  So I am extra honored to receive this from her!  Plus, she's got a great name. :)


Those who receive this award:

  • must link to the person who awarded it to you
  • share 7 things about yourself
  • must award five recently discovered blogs
  • contact those blogs and tell them how stylish you think they are!
Thanks again, Stephanie!  I'm excited to be able to nominate some of my favorite blogs. 
But first, 7 things about myself:
  • Baking fact: I started baking after moving from University of Miami back home to NY.   Going from 85+ degrees to negative temperatures was too shocking to be able to go outside at all.  So I spent my time teaching myself to bake!  Now it is an obsession and a de-stresser. 
  • Career fact: I’m a brand new K-6 Art teacher.  I graduated in December and in February I was lucky enough to be offered a full time elementary art position.  It has been an interesting journey so far! 
  • College fact: My undergraduate degree was in Art History and after a semester in Italy, I now sometimes daydream about an alternate universe where I could be an art restorer in Florence. 
  • Personal Business fact: I have a baking products business with my husband – keep your eye on The Smart Baker because we are rapidly expanding!  Several new products coming out soon (I’m super excited about these new products, I can hardly wait to tell you about them!)
  • Crazy Dog Mom fact: I’m obsessed with my shih-tzu, Sadie.  She appears on my blog from time to time. 
  • Nerd fact: I love art historical fan fiction.  The saucier the better.
  • Mega Nerd fact:  My thesis during my undergraduate degree was entitled, “Roman Women: A study of public sculpture and its significance in the Augustan program of cultural reform”.  Yep, I’m a mega ancient Rome nerd. 
The five blogs I nominate for the stylish blog award are:

Sunday, March 20, 2011

New Product Photos - Our line of Cupcake Towers

I know, I've been a bad blogger lately.  Right now I need to find my way through my first 1/4 year of teaching and focus on surviving, rather than getting blog posts up two or three times a week.  But my blog will have a comeback soon!  Only one more week until spring-break when my kitchen will be full of baking smells again and Ice Cream Before Dinner will have new posts :)

For now, I'll leave you with our new product photos.  I'm so proud of them!  This weekend we made 80 cupcakes and 4 batches of buttercream frosting so we could adorn our line of cupcake towers with adorable cupcakes for a photoshoot.  See??  I have been baking!! I think these pictures came out great, and they showcase our Cupcake and Dessert Towers wonderfully.  
Photobucket

Sunday, March 6, 2011

SMS: Chocolate Pudding and Chocolate Pudding Popsicles

Photobucket


It's Sunday!  And it's time for a delicious edition of Sweet Melissa Sundays.  Leslie of Lethally Delicious is our gracious host this week and she chose Sweet Melissa's Chocolate Pudding as our recipe.  I've never made chocolate pudding from scratch before so I was excited to try this one!


I prepared the recipe just as it was written in the Sweet Melissa Baking Book, but added a little frosty twist to half of the pudding.  I used Wilbur's Semisweet Chocolate.  This chocolate is absolutely delicious and conveniently - it comes in a 2.25 ounce bar - which is exactly the amount we needed for this recipe (even though I was kind of hoping there would be some extra for me to nibble on while preparing the recipe...)
Photobucket


With half of my pudding, I followed the directly exactly and produced some delicious, super rich chocolate pudding.  With some extra heavy cream I whipped up some homemade whipped cream and we had a perfect dessert
 Photobucket


With the other half of my pudding, I decided to change it up a little bit.  Instead of refrigerating after cooling in the waterbath, I whisked the pudding until smooth, put it in a ziplock bag, snipped off a corner and piped the liquidy pudding into a Popsicle Mold.  
Photobucket
I used this Frozen Treat tray I got from CSN Stores. What a handy dandy little tray!  


I froze them overnight and ran a little warm water over the tray to loosen them up and voila...
Photobucket

Photobucket
The creamiest chocolate pudding pops you can imagine... yum.  


Thanks for hosting and picking this great recipe Leslie!  I loved experimenting.  Click to visit Leslie's blog and find the full recipe for Sweet Melissa's chocolate pudding.  And don't forget to visit the SMS site and see how it went for the other SMS-ers who participated this week.  


LinkWithin

Related Posts with Thumbnails