Recent Posts

Sunday, May 31, 2009

Sweet Melissa Sundays #9: Bee Stings with Pastry Cream Filling

This recipe was chosen by Jaime of Good Eats and Sweet Treats. "OOOOOOH" I said OUTLOUD when I saw this week's recipe. A doughnut - bun hybrid filled with pastry cream? Insane. But Oooooh boy. Me and yeast have never really gotten along. I've only used it in cinnamon buns and the occasional pizza dough, but I think only a handful of time has it risen properly for me. This time around? Same ol', same ol'! Why does yeast hate me so much! What am I doing wrong?! The dough did not rise even a smidgeon. I decided to give them a go anyway because I had already prepared the dough, and in the past, my cinnamon buns have always come out excellent, flakey and perfect despite the fact that they usually don't rise a bit. These thoughhhhh?


(I decided to roll my sticky dough balls in cinnamon sugar instead of making the honey caramel)

Despite their little oven-sauna session, still, no rising. Oh well, I'll bake em anyway!


I prepared the (delicious) filling with little difficulty (besides the fact that I had to add extra cornstarch because it was not thickening up). When my buns had cooled, I decided they would NOT be able to be filled. They were not light and airy enough to have room inside for filling! I said I would just cut them in half like a bagel, and slather on some of the pastry cream like you would butter. BUT Daniel seemed to think it could work the original way...


Uhhhh no. It was too dense to fill, and too fragile and crumbly the handle the stress. FAIL!

So we did this...


Overall - Not my cuppa tea. Though i am POSITIVE that we didn't enjoy them because they did not rise. They were like dense little biscuits. If I were not so cursed with yeast, these probably would have been very good - the pastry filling was EXCELLENT. Once I master the use of yeast, WHICH I AM DETERMINED TO DO, I will certainly come back to this recipe.

I hope everyone else's came out better than mine! Be sure to check the other bloggers' versions of Sweet Melissa's Bee Stings!

Thursday, May 28, 2009

The Great Cookie Experiment & 2 year bloggiversary!


Today is my Two year bloggiversary! Hard to believe, it has flown by. I initially started blogging all my baking adventures to be able to keep track of the recipe's I've made more easily - so that when I wanted to make something again, I could look back in my Bloggity Archives, see the pictures to remind me which recipe it is, find the recipe there, and any feedback I included in my post that I received from the recipe by taste testers. Ice Cream Before Dinner has turned into much more than a blog of recipe storage. As I am sure all of you feel, it is a great way to connect with other baking enthusiasts. I went from snapping photos documentary-style, just to get a picture, to building my own little light box to attempt to take nicer pictures. I've come a long way from baking just my favorite, tried-and-true recipes, to making things far outside of my comfort-zone. So thank you to anyone who might read this little old thing, and thank you for taking the time out to make comments. I really appreciate every single one :)

I decided I had to do something special for my bloggiversary. Should I make a fancy 3 tiered cake, painstakingly decorated with fondant and gum paste? Try a complicated new recipe the likes of which I have never tried before? Mmmm, No. I decided I'd go the Classic Route. I know in the past few months, ever since the New York Times Chocolate Chip Cookie article came out there has been a lot of discussion about WHO MAKES THE BEST CHOCOLATE CHIP COOKIE, but I decided that it needed to be revisited.... for the most part because I've never tried the NY Times Recipe, or many of the other recipes others claim to be "The Best". I wanted to taste test them myself and decide for myself! (And also, because someone did Daniel a favor at work, and as payment, he promised them chocolate chip cookies). so THE GREAT CHOCOLATE CHIP COOKIE EXPERIMENT was born!!!

The Great Chocolate Chip Cookie Experiment
I selected THREE different chocolate chip cookie recipes that I found many other bloggers called "their favorite" or "THE BEST". To be fair, I altered the recipes a wee bit. I used the same type of chocolate in all of them, made the same size cookies, and refrigerated all of them for the same amount of time (regardless of whether the original recipe called for chilling or not). This way, all of the recipes would have fair chance of winning - so no one's opinions would be altered by "i like dark chocolate better than semisweet," etc. Then, I also decided to do each recipe TWO WAYS: one batch with sea salt, one batch without sea salt.

The Contenders:
1. Adapted from Jacques Torres, as seen in the New York Times: Click here for article & original recipe.
2. Adapted from "The Chewy" from Alton Brown: click here for original recipe.
3. Adapted from "The Great Book of Chocolate" by David Lebovitz: click here for an adaptation of the original recipe

Chilling time: 36 hours.
Chocolate Chips: Semisweet chocolate chips


MY ADAPTATIONS OF THE RECIPES:

The New York Times cookie:
(original recipe)
2 cups minus 2 tablespoons cake flour
1 2/3 C bread flour
1 1/4 tsp baking soda
1 1/2 tsp baking powder
1 1/2 tsp coarse sea salt
2 1/2 sticks butter, unsalted, softened
1 1/4 C light brown sugar
1 C + 2 Tblspn white granulated sugar
2 large eggs
2 tsp madagascar or mexican vanilla
16 ounces semi-sweet chocolate chips
Extra Sea Salt

Sift the flours, baking soda and powder, and salt together in a bowl, and set aside.
Cream the butter and sugars together until light and fluffy, about 5 min. Add eggs, one at a time, mixing in between each addition. Stir in the vanilla extract, and reduce speed to low. Add dry ingredients and mix until just combined - don't overmix. Drop in chocolate chips and stir a little more just to incorporate. Place dough in a bowl, cover tightly with plastic wrap, and refrigerate.
After 36 hours, preheat to 350 F. Line baking sheet with parchment. Scoop dough balls (about 2 tablespoons each) and place about 2 inches apart on cookie sheet. For half of the cookies, sprinkle lightly with sea salt. Bake until golden brown and still soft - about 13 - 20 minutes (depending on your cookie size). Place cookie sheet on wire rack to cool for 10 minutes, then remove cookies to cool directly on wire rack until cool.
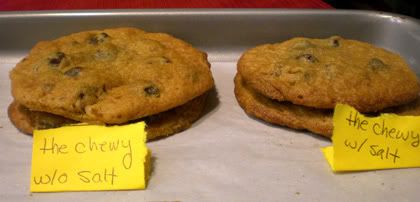

The Chewy:
(original recipe)
1 stick of butter, unsalted, softened
1 1/8 C bread flour
1/2 tsp sea salt
1/2 tsp baking soda
1/8 C granulated sugar
1/2 C + 2 tablespoons packed light brown sugar
A little less than 1 large egg. (I know, I'm weird. Lightly beat it and use about 3/4 of it in the recipe)
1 tablespoon whole milk
3/4 Tsp madagascar or mexican vanilla
1 C semisweet chocolate chips

Melt the butter in a saucepan set on low heat. Sift flour, salt, and baking soda together & set aside. Pour the melted butter in a mixing bowl. Add the sugars, and then cream the butter & sugars together. Add the egg, the milk and vanilla. Slowly add the flour mixture, and mix until just combined. Stir in the chips.
Chill the dough in the frig for 36 hours.
When ready to bake, preheat to 375. Scoop 2-Tablespoon amounts of dough onto parchment lined sheet, Sprinkle sea salt on half of the dough balls, and bake for about 12 - 18 minutes (again, depends on your cookie size) or until golden brown. Cool for 10 minutes on the cookie pan, then remove cookies to cool directly on wire rack until cool.


The David Lebovitz Cookie:
(an adaptation of the original recipe; David Lebovitz's blog; & where to buy The Great Book of Chocolate)
1/2 C granulated sugar
1/2 C firmly packed light brown sugar
1 stick unsalted butter, cold, cut into 1/2 inch slices
1 large egg
1 tsp madagascar or mexican vanilla
1/2 tsp baking soda
1 1/3 C flour
1/2 tsp coarse sea salt
1 1/3 C semisweet chocolate chips

Cream the cold butter and the sugar together. When mixed and smooth, add in the egg, vanilla, baking soda and salt. When incorporated, add the flour and stir by hand. Add the chips and stir just until mixed in. Chill in refrigerator for 36 hours.
When ready to bake, make 2-Tablespoon sized balls and place on parchment lined cookie sheet. Press tops down slightly. Sprinkle sea salt on half of the dough balls. Bake for about 16 - 22 minutes or until golden brown. Remove to rack to cool on cookie sheet for 10 minutes, then remove cookie to cool directly on rack.


Taste testers were all given:


RESULTS:

Ok, this is a tough one. Everyone preferred different cookies. But one thing was a hands down decision: The cookies WITH sea salt were preferred over those without. Mm Yummy. I think I liked the David Lebovitz cookies the best. One taste tester agreed. Two others liked the NY Times. One liked the Chewy. Another liked the texture of The Chewy the best, but the flavor of The New York times and David Lebovitz better. One did NOT like the chewy's flavor (I think that taste tester might not like Brown Sugar taste). SO THE CONCLUSION: All of these chocolate chip cookie recipes are total winners. I know, such a lame answer, right? Each of the recipes had their strong points: The Chewy was really nice and soft and chewy. And the flavor of the Lebovitz and Torres recipes really were delicious. I'd make ALL of these recipes again. My own personal faves: Probably the Lebovitz with the Torres coming in at a close, close, close second place.

Sunday, May 24, 2009

No Sweet Melissa Sundays :(

Sorry, there won't be a Sweet Melissa Sundays post for me this week :( I just started school again after a semester off, and it turns out graduate courses are actually a lot more work than undergraduate courses... though I probably should have guessed that. On top of that, we have family coming in, anddd nobody here really likes Cherry pie very much. Thoughhhh if I did have time to bake, I assure you I would have found a delicious substitution to fit the picky tastes in this household. So I apologize, but I'll see you around next week! Hopefully, I'll have a post soon with the results of an extremely scientific chocolate chip cookie experiment I conducted recently :)

To avoid a posting NOTHING today, I'll post some neato things I've seen floating around the internet lately:

*Cupcake Stop - SOMEONE BEAT ME TO IT, DAMN IT! My sister sent me this fun linky, check it out. PS: I'm jealous of all you NY-ers.
*Silicone Cake Pan Liner - From the fabulous blog Baking Bites who constantly updates me on things I want to own.
*Check it out! - Totally cute, hilarious girl.

In the meantime, still check out the other sweet melissa sundays bakers posts!

Sunday, May 17, 2009

Sweet Melissa Sundays #7: Guinness Gingerbread; and Strawberry Contest Muffins


Guiness Gingerbread, aka Rootbeer Gingerbread

The Sweet Melissa Sundays baking group this week baked up Melissa Murphy's Guinness Gingerbread (p. 12 - 13). It was chosen by the fabulous Katie of Katiecakes. One thing I love about this group is that it gets me to bake things I would normally probably never choose on my own. This recipe was a lot of fun.

I made a few changes to the recipe. Since we aren't really drinkers in our house and I didn't want to be left with a ton of Guinness stout, I used IBC Rootbeer in place of the Guinness beer called for in the recipe. I also substituted maple syrup where the recipe called for Molasses as past recipes have taught me I'm really not in to the taste of molasses. Light brown sugar went in instead of dark because that is all I had, and similarly I used black pepper instead of the ground white pepper the book uses because I didn't have any white. I used my little Baking Bible book and this new fantastic website I found, Cook's Thesaurus to find out that white pepper is basically just a milder less flavorful version of its darker counterpart. So, rather than the 1/4 tsp white pepper the recipe calls for, I used just a light sprinkling of black pepper. Annddd I baked it in a cupcake pan rather than the 9 x 9 x 2 baking dish because I like the ease of give-away-ability that cupcakes allow. Other than that, I followed the recipe. :)

I thought it would make about 9 cupcakes, so I greased & floured 9 wells of a cupcake pan. I soon learned it makes MORE than that, about DOUBLE my estimate to be exact, so I called for help from Daniel who came to the rescue with cupcake liners.


Melissa Murphy says it is best served warm with freshly whipped cream dolloped on top. Well, it is Sunday morning, and I didn't think ahead enough to make whipped cream first. And I really wanted to taste it warm like she said. So we made due with some Ready Whip.


It was very nice! I am sure it would have been even tastier with homemade whipped cream, but even with the store bought stuff it was quite good. With my light brown sugar and my maple syrup substitutions, the result was a mild, subtle flavored cake. I look forward to enjoying the rest of the cupcakes room temperature with frosting on top!

Now, to decide which frosting to use... Rootbeer frosting? Regular ol' buttercream with caramel drizzle (Dan's choice)? We shall see!

*Update* Root Beer Frostingish/Glaze Topping


1 3/4 C confectioners sugar
1/2 stick, unsalted butter, softened
1/4 tsp. vanilla extract
4 Tbs. root beer

Add butter to mixing bowl. Gradually add confectioners sugar to the butter & cream together until well mixed. Add the vanilla and mix until incorporated. Add the root beer. To get the correct consistency, add more root beer or sugar to reach desired adjust thickness. Mine came out somewhere between Glaze & Frosting, but piled on nicely!


Strawberry Shortcake Crumb Muffins


I've also been baking up some other things. Mimi's cafe held a Meaningful Muffin Search contest to find their new Seasonal Muffin Recipe. The amazing Gale Gand is one of the judges, and prizes include $1,000 gift cards to Mimi's, your muffin on the menu, a cookbook signed by Ms. Gand, and $1 from each winning Meaningful Muffin sold will go to "Share Our Strength". I thought, WHY NOT, might as well try and enter, right?? If I don't win, I still got to eat some muffins!

I designed a Strawberry Shortcake Crumb muffin. I thought Strawberries were a good place to start, since the contest was to design their seasonal muffin, and I added a nice crumb topping because, well, everyone likes a good crumb topping.


Recipe to follow soon! Be sure to see how the Guinness Gingerbread came out for the other SMS Bakers!

Sunday, May 10, 2009

Sweet Melissa Sundays #6: Lemon Icebox Cake with Fresh Strawberry Sauce; and Puff Pastry Sticky Buns


http://jenjw4.wordpress.com/

Lemon Icebox Cake with Fresh Strawberry Sauce
This week's recipe for the Sweet Melissa Sundays baking group was chosen by Jennifer of Keep Passing the Open Windows. I really enjoy lemony desserts and definitely do not make them enough, so I was really excited to give this recipe for Lemon Icebox Cake with Fresh Strawberry Sauce(p. 208-210) a try. It seems similar to a lemon meringue except it is served frozen.

It came together rather easily and quickly. I made it exactly according to the directions in the book (that's a first for me!). And unfortunately, I can't report on the taste yet - I'm bringing it for Mother's Day dessert tonight at the fam's house - so the pretty picture of a cut slice, and a review on the taste will have to wait... though we both tasted the custardy filling (prior to baking) and it seems rather promisinggggg.


Yummmm


Gorgeous nilla wafer crust


Piped on meringue topping, cute!


Another drippy picture :)


Can't wait to give the finished product with the fresh strawberry sauce a try! Hope everyone likes it!


Update: Mmmm, very VERY good. Everyone agreed this recipe is a keeper.


Puff Pastry Sticky Buns
This morning, me & Daniel also threw together some Puff Pastry sticky buns. I had some puff pastry left over from the SMS Turnovers, and since Daniel can eat again (and I'm trying to put some weight back on him) we made these for breakfast.


My inspiration came from blogger Erin Cooks who adapted it from the original recipe by Ina Garten published in Barefoot Contessa Back to Basics: Fabulous Flavor from Simple Ingredients. They came out very, very yummy... though very different from a traditional yeasty cinnamon bun. This one is crispier & flaky, and does not feature that delish cream cheese frosting. I would definitely make these again as they were simple to put together and created a perfectly yummy tasting Sunday breakfast treat. I scaled it down as follows:

5 tablespoons unsalted butter, softened
1.5 ounces light brown sugar, packed
1 12x12 inch sheet frozen puff pastry, defrosted

For the filling:
1 tablespoon unsalted butter, melted and cooled
1/3 cup light brown sugar, packed
1.5 teaspoons ground cinnamon

Preheat oven to 400 degrees F. Place a standard cupcake tin on a cookie sheet lined with parchment. Lightly spray 6 - 7 of the wells with non-stick spray.

With a hand-mixer, combine the 5 tablespoons butter and 1.5 ounces brown sugar. Place 1 rounded tablespoon of this mixture in each of the 12 muffin cups.

Lightly flour a cutting board or stone surface (I did it directly on my cleaned granite countertop). Unfold puff pastry & brush the whole sheet with the melted butter. Leaving a 1-inch border around the edges of the sheet, sprinkle with the 1/3 cup of brown sugar & the cinnamon. Starting with the end nearest you, roll the pastry up snugly like a jelly roll around the filling, finishing the roll with the seam side down. If needed, trim the edges to make it a nice flat end. Slice the roll in 6 (or 7 if you did not need to trim, like me) equal pieces, each about 1 1/2 inches wide. Place each piece, spiral side up, in the cupcake wells, on top of the buttery mixture.

Bake for 25 minutes, until the sticky buns are golden to dark brown on top. Allow to cool for 5 minutes only, scoop the buns out with a spoon and invert onto the parchment paper. Best enjoyed while still warm!


Be sure to check out how to Lemon Ice Box Cake & Strawberry Sauce came out for all of the other bakers!

Tuesday, May 5, 2009

Vanilla Ice Cream with Dulce de Leche Swirl

What to do when your boyfriend is getting oral surgery, and your blog's name is Ice Cream Before Dinner. What to do, What to do. Well, besides making him a frig full of mushy items to eat, fill your freezer up with homemade ice cream, of course! Now, as you may know, Daniel & I are spoiled by Mix-In loaded ice creams, scooped on top of warm home-made brownies. When your gums are raw, however, and several of your teeth have just been extracted, the possibility of cookie dough chunks, brownies, and other chewing-necessary Additions disappears. But I couldn't make him just plain vanilla, so I knew I wanted a gooey swirl of some sort. In comes my obsession, The Perfect Scoop by David Lebovitz. Strangely enough, I had never made his basic vanilla ice cream recipes before. So, for my ice cream base, I chose "Vanilla Ice Cream, Philadelphia Style" (p. 25). I liked that it didn't involve making a cooked custard step, and that he described it as having a lighter taste. I was sold. Plus, this doesn't require any eggs, and I needed to reserve my eggs for Daniel's mushy dinner menus. I prepared this simple recipe, and popped it in the frig to chill.

For the swirl, I chose his "Dulce de Leche" (p. 171). I chose this one because from my last attempt at making caramel (See Sweet Melissa Sundays post for Strawberry Turn Overs), I learned it is quite a chore... and one that doesn't always turn out right. This Dulce de Leche required only a can of sweetened condensed milk, a preheated oven, and some patience....

You simply take your 14 oz. can of sweetened condensed milk, pour it into a dish about the size of an 8 x 8, and then put that 8 x 8 (or similar sized dish) inside a larger dish which is filled half way with water. Stick it in the oven for quite a while (see his book for more details) and MAGICALLY, out comes delicious, perfect Dulce de Leche!

Post-Bake Picture:


As the Dulce was cooling, I began churning the Ice Cream mixture in my Ice Cream maker. When it was done, the Dulce was just about cool enough to be added to the ice cream.

Take some ice cream, and pour it in your Air Tight, Freezer container of choice. Then, blob some of your Dulce de Leche on top:


Then, repeat. Make another ice cream layer, followed by another Dulce layer. Repeat until all of the ice cream is gone (there will probably be some dulce de leche left - that is fine! Keep it in a glass, or microwaveable container, so that when you serve your sundaes, you can microwave it and pour it on top of your dessert!)


the remaining dulce

Sorry, no glorious Sundae shots this time. But trust me, it was delicious.

Sunday, May 3, 2009

Smownies (Smores Brownies)


S'mores? Smores? I never know which way to spell it. Hm. Anyway, I made these last week, but am just getting around to posting it now. Life has been hectic! Daniel got his wisdom teeth out on Thursday morning, and well... he's... still alive. Thursday and Friday weren't so bad but by Saturday he developed a migraine and a bunch of other no-fun symptoms to boot. Boo to wisdom teeth! If almost everyone needs to have them extracted, WHY have we not evolved them out of our bodies by now? Maybe in another few thousand more years, future generations will be lucky enough to be born without them. And before he went in for surgery, Daniel was nice enough to pass on a nasty cold to me. Sweeeeet! So that is why there is no Sweet Melissa Sundays today. :( For now, I shall share with you these Smownies, or S'mownies..... or S'more Brownies..... or Smore Brownies. Whatever you'd like to call them.


I took inspiration from two fabulous, fabulous bloggers: Joy The Baker & Cookie Madness. (To see their versions of S'mores Brownies, click the links I provided) I slightly adapted Joy's brownie recipe (which she got from Bon Appetit, October 1991) and used Anna of Cookie Madness's idea for a graham cracker crust. The results were quite delicious, they were a big hit. The brownies were moist, but less fudgy than other brownies recipes I've prepared. The graham crust was subtle but there, and added a really nice flavor. The marshmallows were perfectly sticky and sweet.

Graham Cracker Crust:
3/4 cup graham cracker crumbs
1 tablespoon sugar
4 tablespoons butter, melted

Preheat the oven to 350 degrees F. Grease & flour an 8 inch square glass pan**
Mix the graham cracker crumbs with the sugar and melted butter. Press firmly into bottom of lined pan and bake for 8 minutes. Set on a cooling rack while you prepare the rest of the recipe. Leave the oven on.

S'mownies Recipe:
1 1/2 cups all purpose flour
2 teaspoons baking powder
1 teaspoon salt
2 sticks unsalted butter
6 ounces unsweetened chocolate, chopped
5 large eggs
1 1/4 cups light brown sugar
1 cup granulated sugar
2 teaspoons vanilla
Some extra not-too-crushed graham cracker crumbs (I used about 1/4 C)

Whisk the flour with the baking powder and salt to combine. In the top of a double boiler, melt the butter and chopped chocolate. Stir until chocolate it totally melted and mixture is smooth.

Beat the eggs, sugar and vanilla in a large bowl. Add the warm chocolate mixture and stir. Then add the dry ingredients and stir just to combine - don't overmix! Fold in graham crumbs. Pour batter on top of prepared crust. Dot with large marshmallows. Bake until toothpick inserted into center comes out with clean with only moist crumbs attached, about 30- 40 minutes.

**I have found the best results when I grease a pan with shortening [[mmm, yummy I know, blegh... just using it to grease the pan!]] then lay a sheet of parchment (which sticks because of the shortening), then grease the parchment with shortening, and then dust the whole thing with flour. Then after it is done baking, you simply lift up the parchment sheet, which releases easily because you have greased between the pan and the paper! There is no stickage anywhere! I'd rather be on the over-greased, safe side than have a cake or other delish recipe destroyed because it would not come out of the pan!


terrible picture, I know, but I included it so you can see the parchment sling & also how lightly I pushed in the mallows.

LinkWithin

Related Posts with Thumbnails